
LocalDev
Introduction
Why use LocalDev?
A local development environment is ideal for several use cases:
-
Starting a new application from scratch will allow you to develop in an environment that will be setup in the exact same way as your final production target for you and all other developers on the project.
-
Debugging legacy applications which you haven’t touched for quite a while can be quite a hassle. By cloning a production environment into a local development environment using a snapshot based clone, you have a true zero config exact replica from the production environment allowing you to reproduce any issue without the classical “it works on my machine” wall you’ll be bound to hit depending on the issue at hand.
What functionality does LocalDev provide?
-
It runs all your applications inside containers within a local virtual machine that replicates the way DeltaBlue.cloud hosts run your applications.
-
It exposes these applications on your machine with local hostnames.
-
It allows you to control this environment in exactly the same way as your environments in the cloud.
-
It supports all necessary platform features, such as running scenarios, cloning and snapshots.
Installing requirements on your machine
The DeltaBlue local dev environments require Vagrant with the VirtualBox provider to set up a local dev environment on your machine. If you already have these installed, there is a high probability you can use your existing setup.
To provide easy access to your development environment, DeltaBlue has built an additional service that manages readable hostnames for your applications in the local hosts file on your machine.
The DeltaBlue hosts-updater is currently supported on Debian/Redhat/Arch-based systems, as well as macOS and Windows.
You can follow the brief walkthrough below for installing a compatible combination of Vagrant and VirtualBox. Beware that at the time of writing, Vagrant version 2.2.6 is not compatible with VirtualBox 6.1.x! So be sure to install VirtualBox 6.0.x when you are running Vagrant 2.2.6 or your Vagrant will not be able to launch the VirtualBox instance.
Installing Vagrant
If you already have Vagrant installed on your machine, you can skip this step, but as mentioned above, be sure to use a VirtualBox version that is compatible with the Vagrant version you have installed!
Linux - Debian-based (Debian, Ubuntu …)
-
Make sure your package list is up-to-date by running:
sudo apt update. -
Run:
sudo apt install vagrant
Linux - Redhat-based (Redhat, Fedora …)
-
Make sure your package list is up-to-date by running:
sudo dnf update. -
Run:
sudo dnf install vagrant
Linux - Arch-based (Arch, Manjaro …)
- Run:
sudo pacman -S vagrant
macOS or Windows
-
Download the macOS or Windows version
-
Install it
Installing VirtualBox
If you already have VirtualBox installed on your machine, you can skip this step. Beware of existing compatibility issues between Vagrant and VirtualBox. Vagrant 2.2.6 will not work with VirtualBox 6.1.x or higher!
Linux - Debian-based (Debian, Ubuntu …)
-
Make sure your package list is up-to-date by running:
sudo apt update. -
Run:
sudo apt install virtualbox-6.0
Linux - Redhat-based (Redhat, Fedora …)
-
Make sure your package list is up-to-date by running:
sudo dnf update. -
Run:
sudo dnf install virtualbox-6.0
Linux - Arch-based (Arch, Manjaro …)
- Run:
sudo pacman -U https://archive.archlinux.org/packages/v/virtualbox/virtualbox-6.0.8-2-x86_64.pkg.tar.xz
macOS or Windows
-
Download the macOS or Windows version
-
Install it
Installing the DeltaBlue hosts updater
This is an additional application that runs as a service on your machine. It listens for http requests from your vagrant box, and registers the application urls within it as locally accessible hosts by managing your /etc/hosts file.
Linux - Debian-based (Debian, Ubuntu …)
-
Execute
wget https://deltablue-localdev-public.s3-eu-west-1.amazonaws.com/linux/linux-hosts-updater_0.1.3-15-g8f6d1be_amd64.deb -
Run:
sudo dpkg -i linux-hosts-updater_0.1.3-15-g8f6d1be_amd64.deb -
Enable it to auto start on boot:
sudo systemctl enable hosts-updater.service -
Start it for immediate use now:
sudo systemctl start hosts-updater.service
Linux - Redhat-based (Redhat, Fedora …)
-
Execute
wget https://deltablue-localdev-public.s3-eu-west-1.amazonaws.com/linux/linux-hosts-updater_0.1.3-15-g8f6d1be_amd64.rpm -
Run:
sudo dnf linux-hosts-updater_0.1.3-15-g8f6d1be_amd64.rpm -
Enable it to auto start on boot:
sudo systemctl enable hosts-updater.service -
Start it for immediate use now:
sudo systemctl start/enable hosts-updater.service
Linux - Arch-based (Arch, Manjaro …)
-
Execute
wget https://deltablue-localdev-public.s3-eu-west-1.amazonaws.com/linu x/linux-hosts-updater_0.1.3-15-g8f6d1be_amd64.tar.xz -
Run:
sudo pacman -U linux-hosts-updater_0.1.3-15-g8f6d1be_amd64.tar.xz -
Enable it to auto start on boot:
sudo systemctl enable hosts-updater.service -
Start it for immediate use now:
sudo systemctl start/enable hosts-updater.service
macOS
-
Download the macOS installer
-
Install it
Windows
-
Download the Windows installer
-
Install it
Setting up a local environment for your project
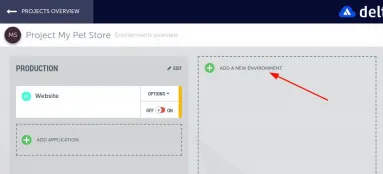
Create your local environment
-
Create a new environment in your project by clicking “Add a new environment”:
-
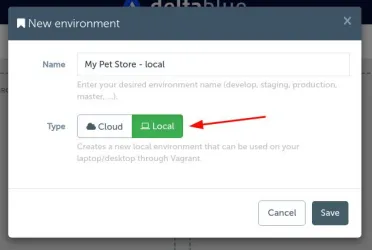
Mark the environment as “local”:
-
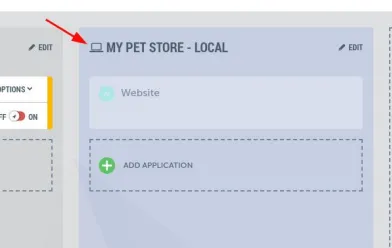
Now click the save button in the modal to create the environment. The LocalDev environment will be distinguishable by the PC icon: Note: a LocalDev environment will only be visible to the user who created it!
Starting your local environment
-
Download the vagrant file by clicking the PC icon and selecting the appropriate link from the dropdown menu:
-
Move the downloaded Vagrantfile to a location of your choosing. We recommend placing it in a new empty folder to prevent clutter.
-
Inside the directory of your Vagrantfile, run: vagrant up

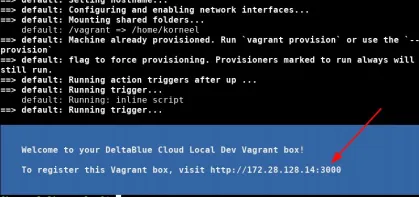
Registering your Vagrant box
-
After the first time you have executed vagrant up, you will see a message that looks like this:
-
Navigate to the link as shown in the message which will bring up a login page.
-
Enter your DeltaBlue.cloud username and password and make sure you see a confirmation about your box being authenticated successfully.
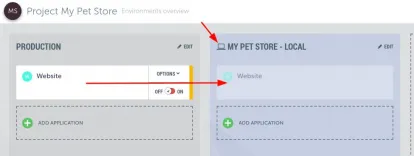
Setting up your applications inside the local environment
-
You can drag and drop any application from another environment to your local dev environment, or you can click “Add application”:
-
When all the applications are present in your local dev environment, you can launch them to start working on your laptop! Be sure you have registered the box first!
Also take care not to lose your internet connection during the launch! When all applications are launched, you can safely disconnect from the internet should you want to. You will only need an internet connection if you want to execute actions using the web UI, otherwise you can develop offline.