DeltaBlue
Creating a first scenario
x min read
On this page you’ll learn how to create and run a scenario, how to create custom actions, how to stop running scenarios and more.
What is a scenario?
A scenario is a list of actions that are executed sequentially. When an action (task) fails, the entire scenario is marked as ‘failed’ and will stop running immediately. You can view the output of the failed action to investigate what went wrong.
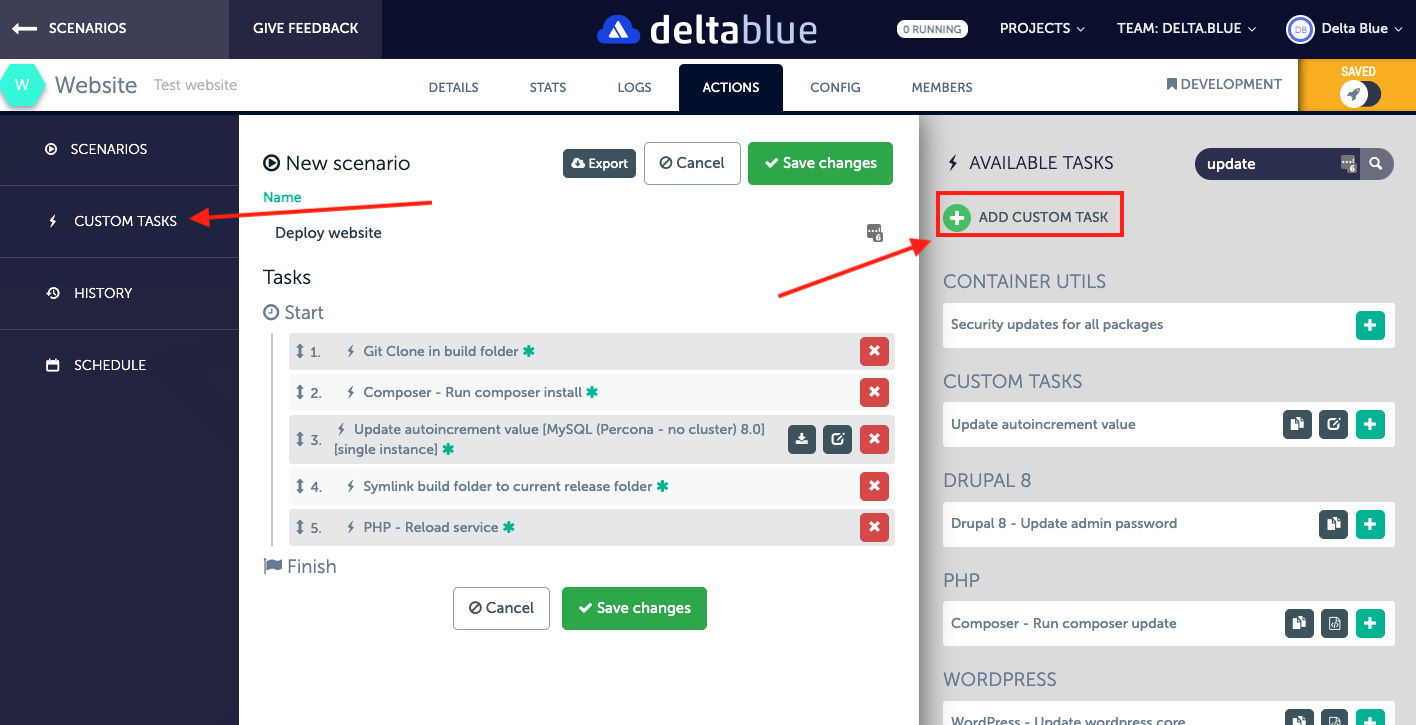
Create a scenario
Navigate to the application in which you want to create a scenario. On the application detail page, click on the “Actions” tab.
By default, the ‘Scenarios’ menu item on the left is active. Click the “Create new scenario” button in the top right corner. An empty scenario is created. Please give it a name (eg “Deploy application”).
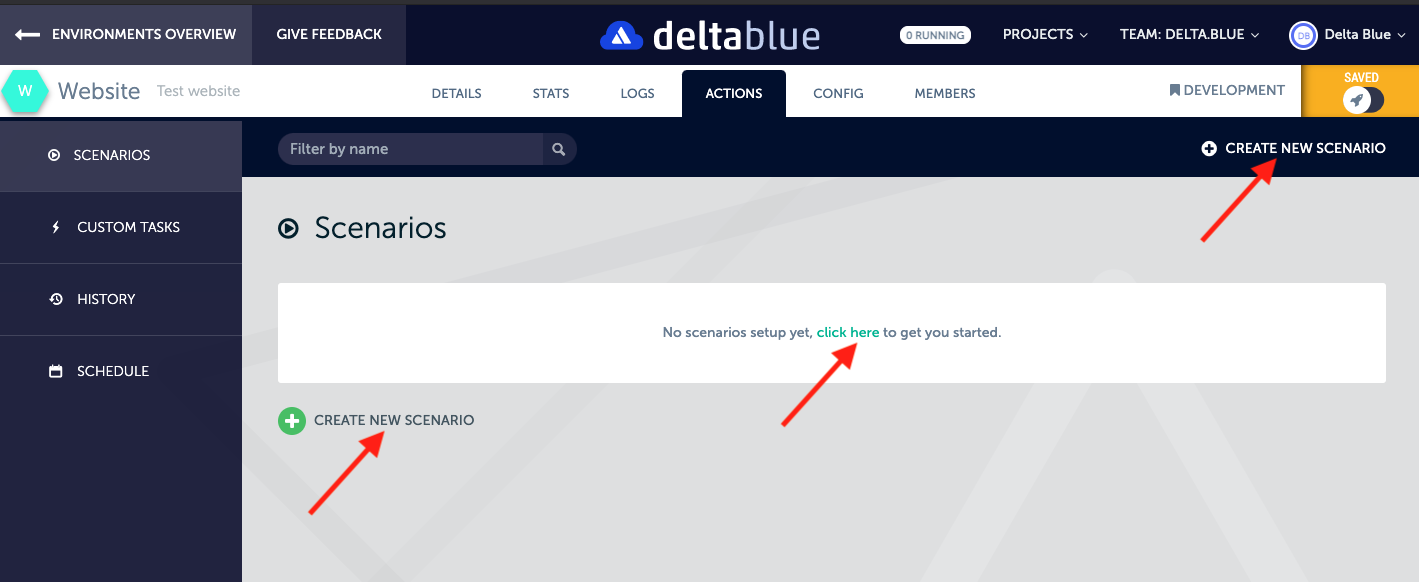
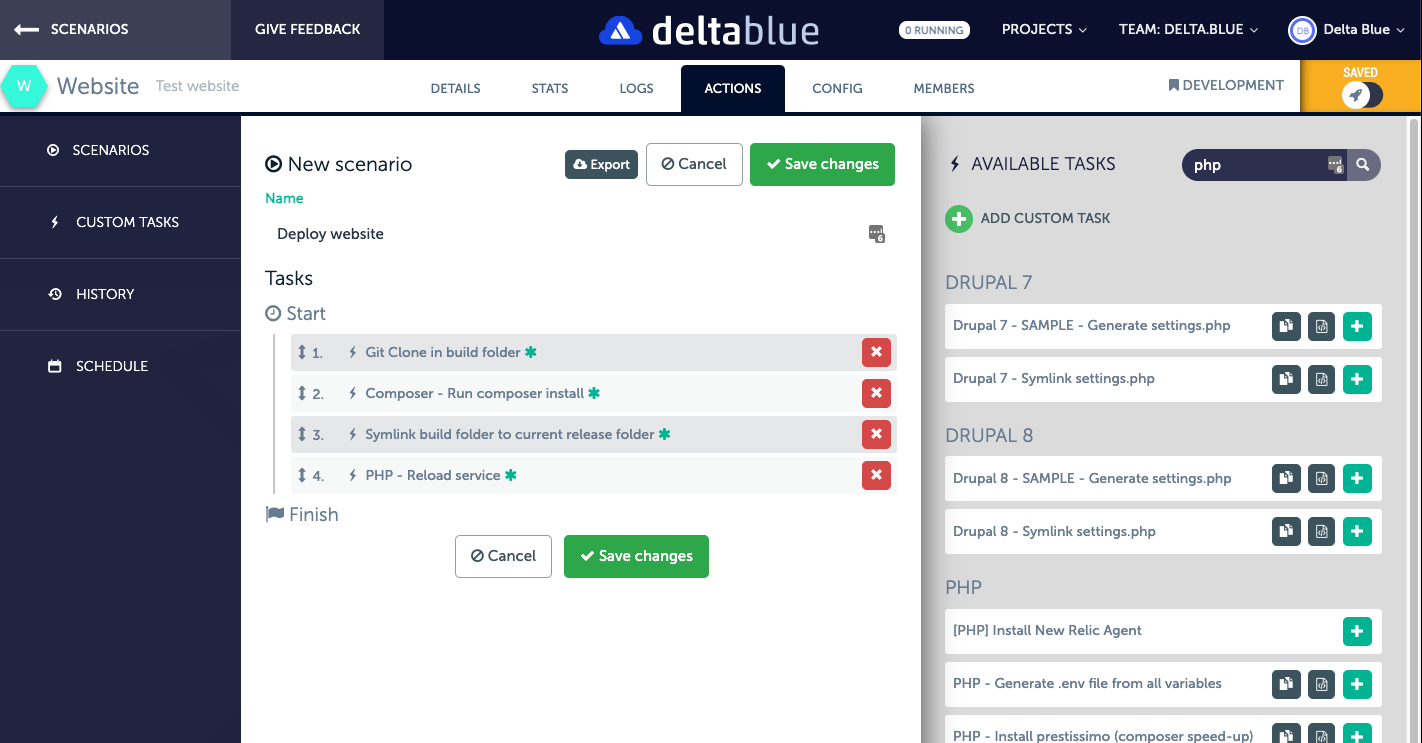
On the right side of the screen, you’ll see a list of available actions. Use the green “+”-sign to add an action to your scenario.
In case you want to create and add a custom action, please read the chapter “Create a custom action”.
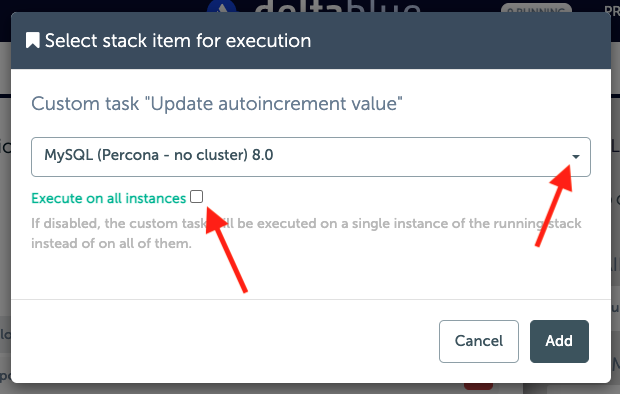
When you add a generic or custom action, you’ll get a popup that asks which stack item you want to execute this on. You’ll also have the option to check or uncheck the ‘Execute on all instances of the selected stack item’. Executing on all instances is sometimes not what you want, e.g. when you want to perform a database schema update.
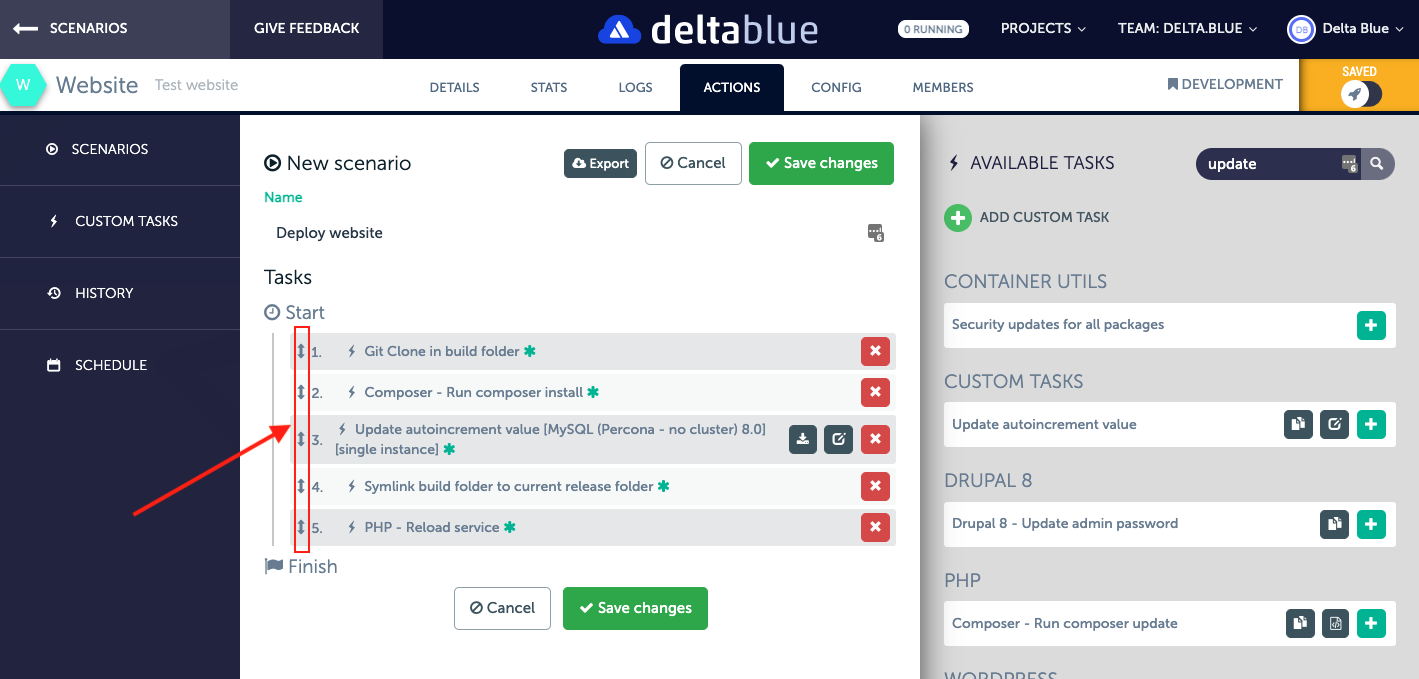
Once your scenario contains all actions, you can reorder them by clicking the up&down arrows sign before the number of the task.
Click the green “Save changes” button and your scenario is saved.
Create a custom action
You can create a custom action in 2 ways: either on the edit scenario page, or when you use the “Custom actions” menu item on the left (below the “Scenarios” menu item).
On the scenario creation page (or on the custom actions page), click the “Create new custom action” link in the right side of the screen. A modal window pops up which contains 2 different parts: on the left you’ll see a “name” field and below a black “script” field, while on the right side of the modal, you’ll see some variables together with their values.
Let’s first give the custom action a logical name, eg “Clear cache”. If this action is specific for an application or project, it might be a good idea to prefix the name with your application or project name.
In the script field, you can put bash commands. If you want to use
variables in. your script, you can use the ones on the left. If you want
to insert the value of a variable, click the copy/paste icon next to the
variable you want to insert. Eg if you click the copy/paste icon next to
the ‘currentRoot’ variable and you paste it in the script field, you’ll
see that the script field now contains {{currentRoot}}. When your
action is executed, this is replaced with the value of the variable.
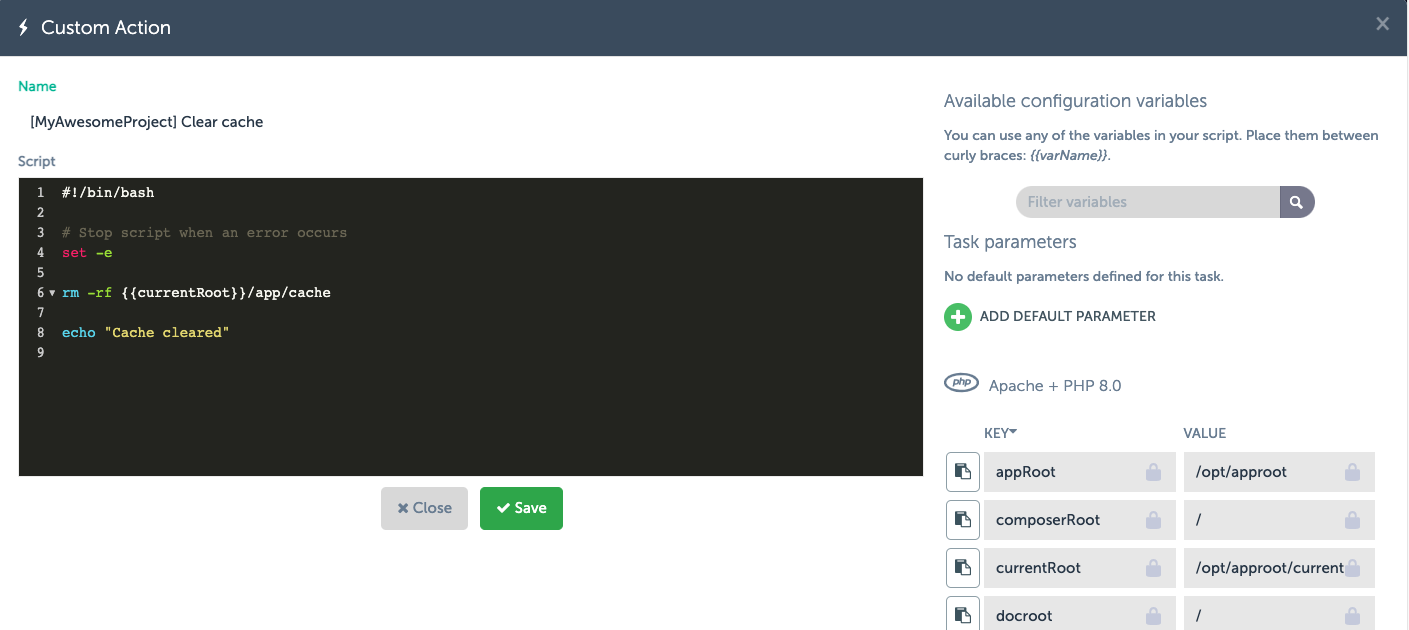
Click the green “Save” button to save your task.
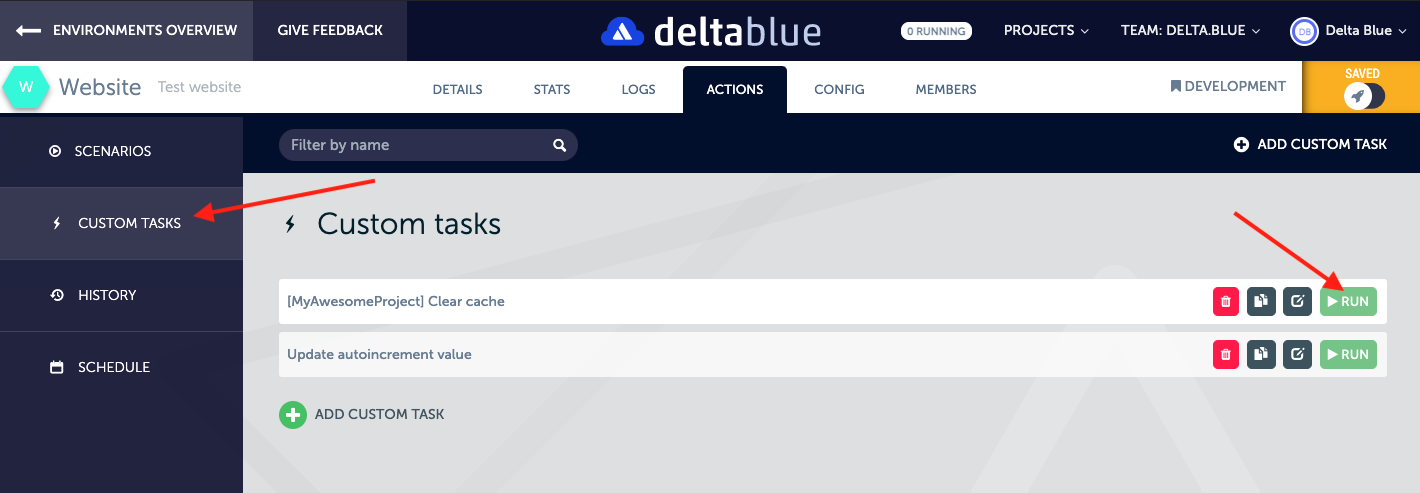
Executing actions without a scenario
Sometimes you just want to quickly execute a custom action without all the hassle of creating a scenario for it and adding it to the scenario.
Please click on the “Custom actions” menu item on the left. You’ll see a list of custom actions or you can create a new one using the “Add custom task” button in the top right corner.
Click the green “Run” button next to the custom action you want to execute. When you do this, a modal window will open which asks you which stack item you want to execute the custom action on, and if you want to execute it on all instances. Click the green “Run” button to actually execute the task.
After the task has been completed, if you click in the menu on the left on “History”, you’ll see a line with the description “Run task: ……”. Using the “details” button on the left, you can see the output of the task (if any).
Important note: you can only execute scenarios or actions when your application is “running”. In case your application is not running, the “Run” button will get the color lightgreen and will be disabled.
When a task can be executed, the “Run” button will be dark green:

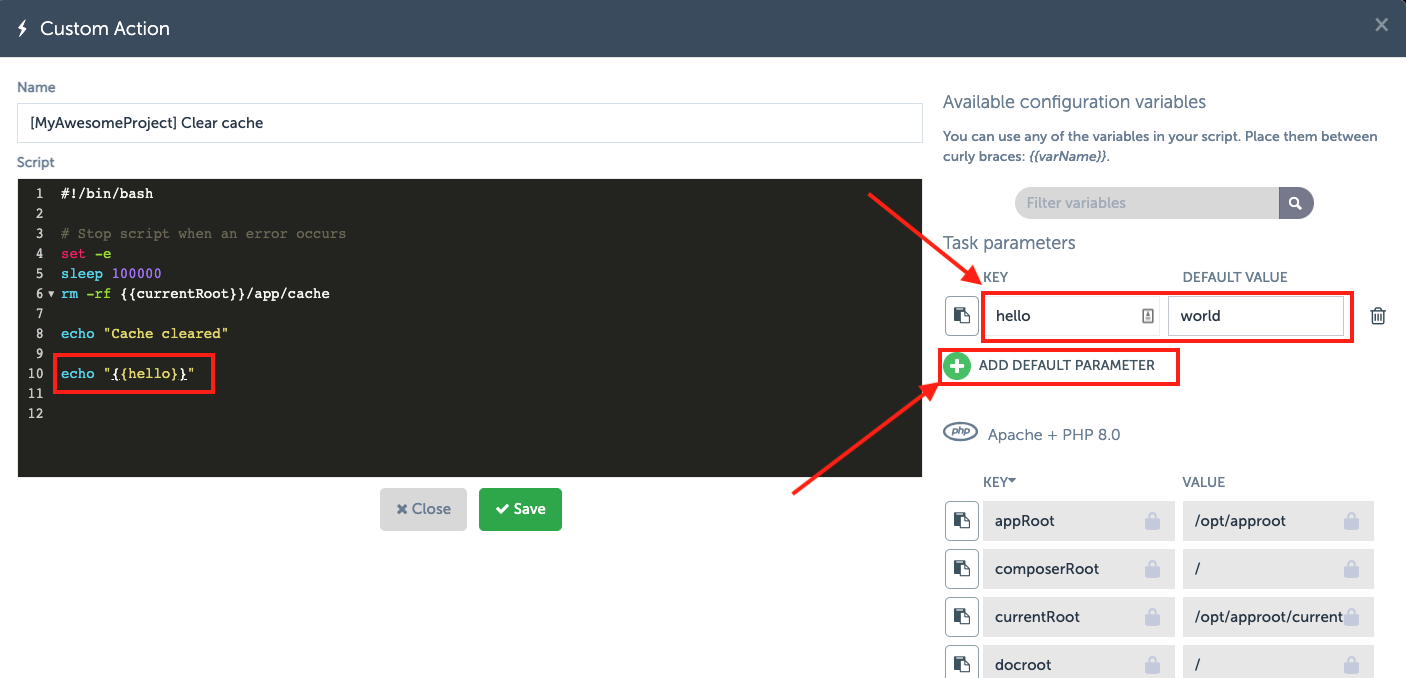
Reusing actions with task parameters
The real power of actions on the platform, is that you can create them as generic as you wish, and reuse them in other scenarios by using “parameters”.
First create your own custom action (see the “Create a custom action” chapter on how to do that).
On the right side of the screen, click on the “Add default parameter”.
Enter a value in the “key” field and a value in the “default value”
field. For demonstration purposes, we use “hello” as key and “world” as
default value. In the script screen, we type: echo {{hello}}. Then we
save the task.
We add the newly created task to the scenario using the green + sign.
In the actions list of the scenario, the custom action was added, and you’ll see a hash ( ‘#' ) sign next to it. When you click on it, you’ll see that the parameter is “hello” and the value is set to “world”. If we don’t change this, this specific task will print the text “world”. If we do change the value, the task will print the new value. This way, you can re-use this task across scenarios, applications etc. while using different parameters/values.
Importing/exporting scenarios
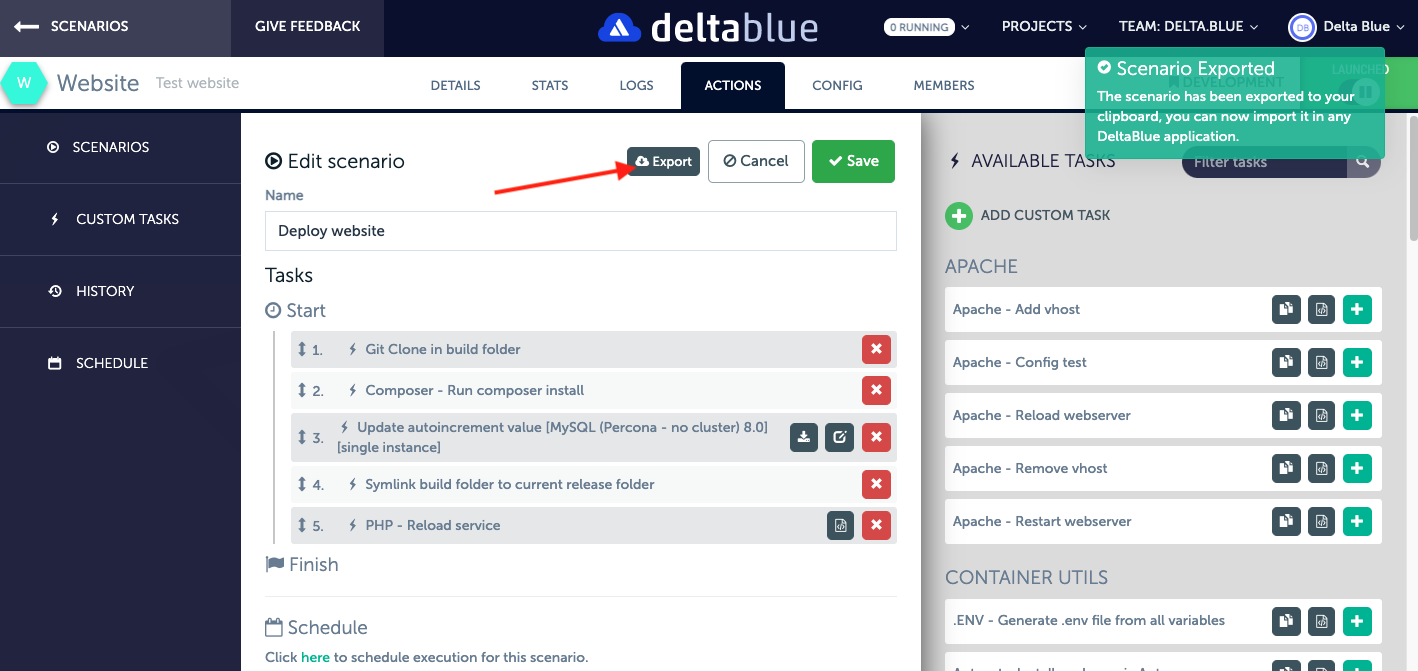
A scenario can be copied to any other application or project. To do so, click the edit button of the scenario you want to copy.
At the top, next to the Cancel and Save buttons, you’ll see an “Export” button. If you click this, you’ll see a green message saying “Scenario Exported”.
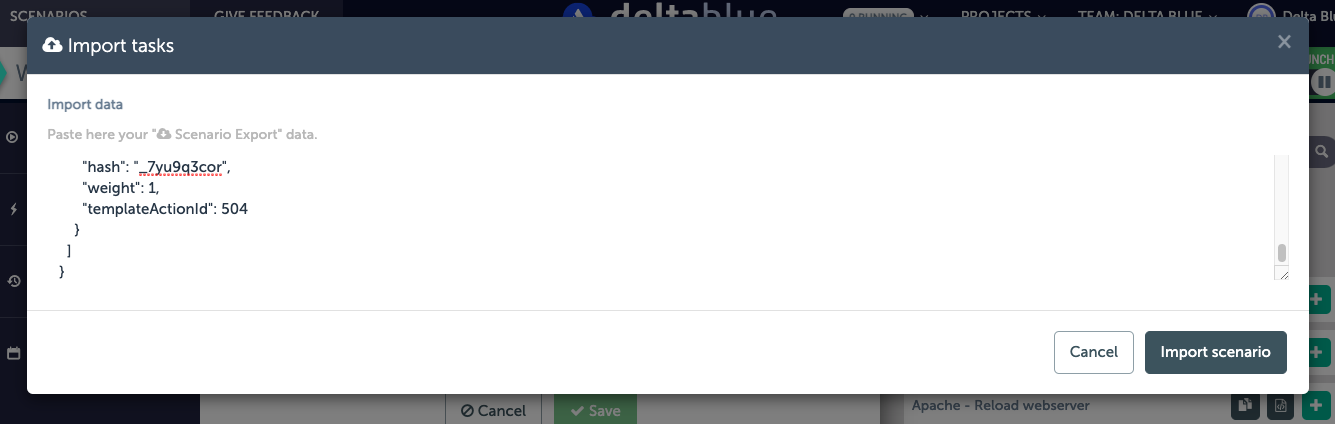
Now navigate to the other application you want to copy the scenario to and click the “Create new scenario” button. You’ll now see an “Import” button next to the Cancel and Save button. When you click this, a modal pops up with a large text area. Click in this field and paste (Ctrl-v). You’ll see that the text area now contains a JSON representation of your previously copied scenario. Click on the “Import scenario” button and you’ll see that the actions were added to the scenario.
It’s possible that some actions have a red label “Missing target”. This is when a custom action was copied and the new scenario does not know yet which stack item to execute that custom action on. If you click the red “Missing target” label, a modal pops up in which you can choose the desired stack item on which to execute this task.
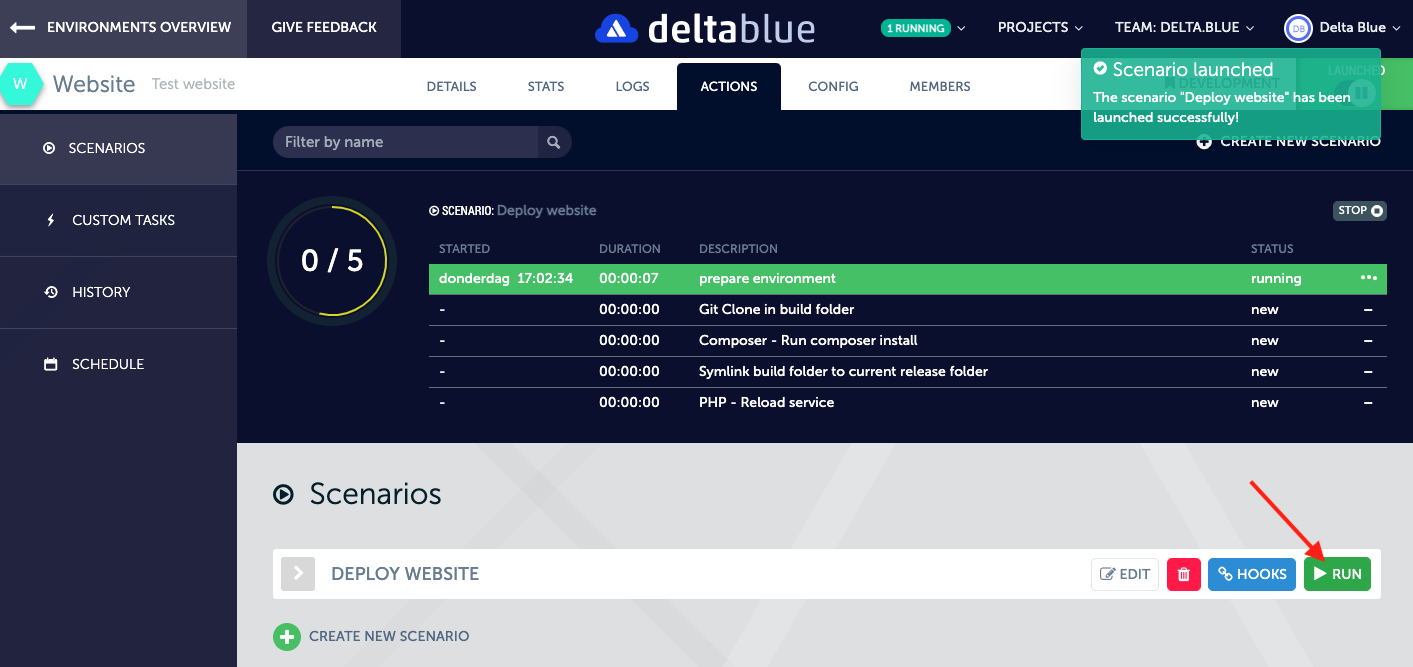
Running a scenario
Open the scenarios list and click the green “Run” button. You’ll see that the list of actions is displayed at the top of the page, together with a spinner which indicates the progress.
Once the scenario has been executed completely (or stopped because of an error), you can see the output when you click the “History” menu item on the left. In the list of scenarios, click the “details” button on the right. For each task that was executed (and that has any output), you’ll see a “View log” button which will show you the output of a task.
In the history list, you will also see an icon with circular arrows for custom scenarios. Clicking this will execute the latest version of that scenario. If the scenario was altered since the execution of the entry you clicked the circular arrows, the outcome might be different!
Stopping/killing a scenario
When you want to stop a running scenario, click on the “Scenarios” or “History” menu item on the left. In the scenario progress indicator, you’ll see a “STOP” button in the top right corner. If you click this, you can stop the execution of the scenario.
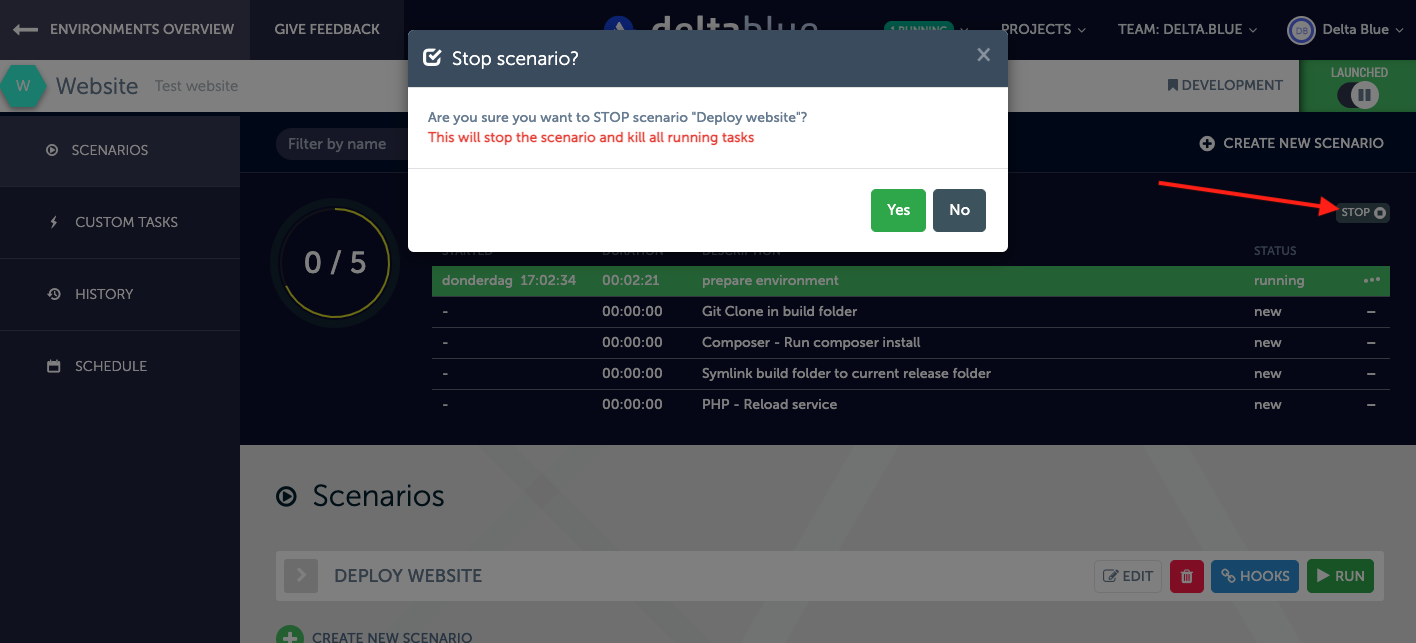
Please note that you can only stop scenarios you created yourself. You cannot stop the application launch or stop as this could lead to containers being in an unpredictable or broken state.
Strategy/concurrency of executing scenarios
When you run several scenarios for an application, they will be executed sequentially! Each application can only have 1 active (running) scenario. Launching the same scenario again while it is still running will result in it being queued. Doing this again will not queue another run since there is already one in the queue for that particular scenario.
Actions within a scenario are also executed sequentially. When a task is set to run on multiple instances of a stack item, this task is executed in parallel, so on all instances simultaneously.
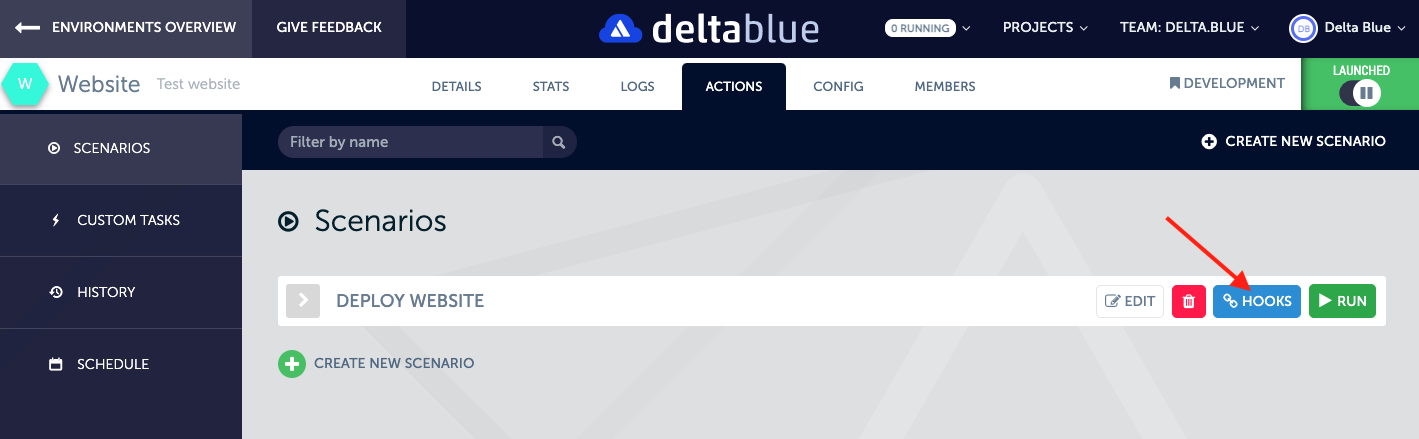
Webhooks
Any scenario you create can be converted into a “webhook”. Please note that a webhook is an URL with some hashed parameters but without any authentication. When a webhook is accessed (e.g. in a browser), the scenario associated with it is executed.
Go to the scenarios list and click the blue “Hooks” icon next to the scenario you want to create a webhook for. When you click the “Generate” button , you’ll see that the “Webhook URL” field now contains an URL with a large hash. When this URL is accessed (e.g. in a browser), the scenario is executed.
You can disable the webhook at any time, and/or generate a new hash for this webhook by using the “Disable” or “Regenerate” buttons.
A good usecase for webhooks is to trigger a deployment on a development environment when a commit is made to a GIT repository. Consult the manual of your GIT service on how to trigger webhooks.