x min read

Odoo is an all-in-one management software that offers a range of business applications that form a complete suite of enterprise management applications targeting companies of all sizes. Odoo is an all-in-one business software including CRM, website/e-commerce, billing, accounting, manufacturing, warehouse - and project management, and inventory. Source: Wikipedia
Odoo can be installed in several different ways:
- Packaged installers for all major distributions like Ubuntu, Debian, Fedora
- Source install (from Git)
In this tutorial we cover all the steps required for installing and configuring Odoo 12 for production using the tool "Buildout".
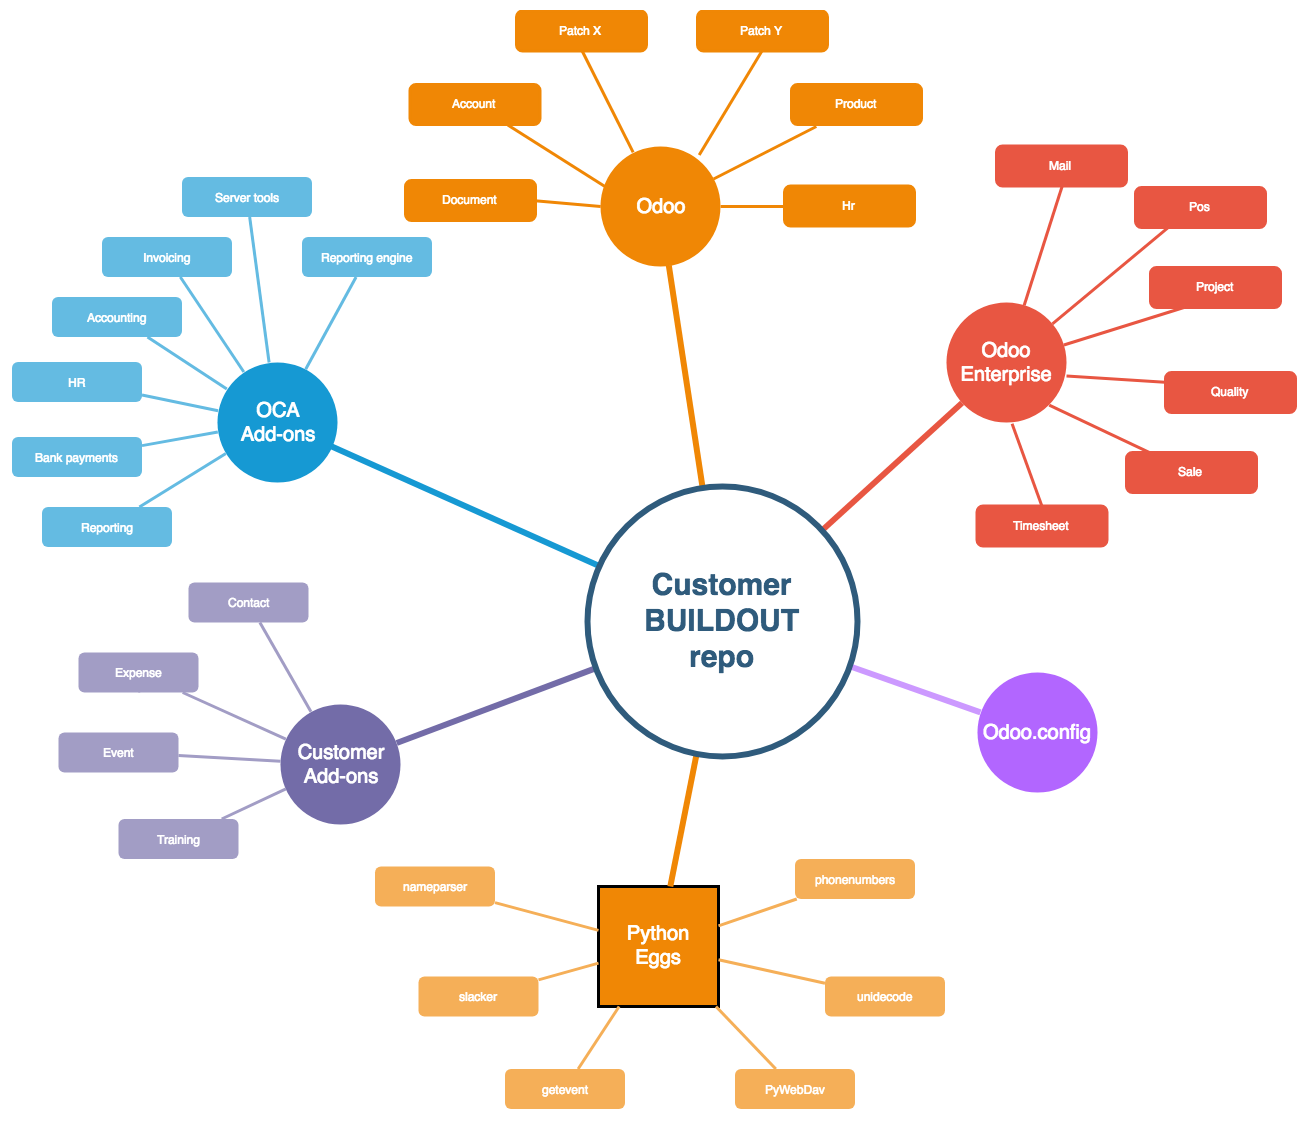
Typically when doing a Odoo setup for a customer, you would have to install various different Odoo code libraries, public Odoo add-ons (like OCA), custom add-ons & python dependencies, ... before you can start with the configuration of the Odoo server and the Odoo software.
To streamline this whole setup process and make it repeatable, we are going to use Buildout.
Buildout is a tool for automating software assembly.
- Apply software and templates to generate configuration files and scripts.
- Applicable to all software phases, from development to production deployment.
- Based on core principles:
- Repeatability
- Componentization
- Automation
Buildout.cfg explained
Buildout is a CLI tool for dependency management. It uses a config file to specifiy all dependencies, code repositories, possible patches and installation tasks. The buildout configuration is stored in a simple ini (ConfigParser) style text file; that defines some sections, some options for those sections, and some choices in the options.
By default, the buildout command looks for a file named buildout.cfg to find its configuration.
A Buildout.cfg has a different section with configuration options per part. The most important of these parts is the buildout part itself, which controls the options for the buildout process itself.
A buildout example:
[buildout]
parts =
    env
    odoo
newest = false

## Reduce Buildout download & build time (http://www.buildout.org/en/latest/topics/optimizing.html)
eggs-directory = /opt/buildout/eggs
download-cache = /opt/buildout/download-cache
abi-tag-eggs = true

## Install build extensions
extensions =
    gp.vcsdevelop
    mr.developer
vcs-extend-develop = git+https://github.com/anybox/anybox.recipe.odoo@master#egg=a.r.odoo
vcs-update = true

[versions]
psutil = 2.2.1

[env]
recipe = gocept.recipe.env

[odoo_vars]
## Odoo community
odoo_branch = 12.0
odoo_git = https://github.com/odoo/odoo.git
odoo_dir = ${buildout:parts-directory}/odoo

## Enterprise add-ons
enterprise_branch = 12.0
enterprise_git = https://github.com/odoo/enterprise.git
enterprise_dir = ${buildout:parts-directory}/enterprise

## OCA add-ons
oca_git = https://github.com/oca
oca_dir = ${buildout:parts-directory}/oca
oca_server-tools_branch=12.0
oca_web_branch=12.0

## Custom add-ons
custom_git = ssh://[email protected]:deltablue-cloud/odoo-buildout-custom.git
custom_dir = ${buildout:parts-directory}/custom
custom_branch = release/1.0

[odoo]
## GIT settings to reduce the GIT download sizes
git-depth = 1
git-warn-sha-pins = False
update-git-submodules = always

## Odoo anybox recipe
recipe = anybox.recipe.odoo:server

release = ${odoo_vars:odoo_branch}

## Python eggs
eggs =
    psycogreen
    pyusb
    unidecode
    inouk.recipe.odoo_cmd
    PyWebDav
    nameparser
    phonenumbers
    pyOpenSSL
    num2words
    xlrd==1.0.0
    pyPDF2
    gevent

## Git install Odoo Community
version = git ${odoo_vars:odoo_git} ${odoo_vars:odoo_dir} ${odoo:release}

addons =
## GIT Enterprise add-ons
    git ${odoo_vars:enterprise_git} ${odoo_vars:enterprise_dir} ${odoo_vars:enterprise_branch}

## GIT OCA add-ons
    git ${odoo_vars:oca_git}/server-tools.git ${odoo_vars:oca_dir}/server-tools ${odoo_vars:oca_server-tools_branch}
    git ${odoo_vars:oca_git}/web.git ${odoo_vars:oca_dir}/web ${odoo_vars:oca_web_branch}

## GIT Custom add-ons
    git ${odoo_vars:custom_git} ${odoo_vars:custom_dir} ${odoo_vars:custom_branch}

## Odoo configuration file
## - db settings
options.db_host = 127.0.0.1
options.db_user = odoo
options.db_password = False

## - directory settings
options.data_dir = /var/lib/odoo

## - application settings
options.logfile = ${buildout:directory}/var/log/odoo/odoo-server.log
options.without_demo = True

## - system settings
options.proxy_mode = True
options.limit_time_cpu = 900
options.limit_time_real = 1200
options.workers = 2
options.max_cron_threads = 1

## Upgrade script
upgrade_script = odoo_upgrade.py run
A buildout.cfg file consists out sections, that groups configuration instructions.
We can break our Odoo buildout.cfg in the following sections:
buildout section
[buildout] is the main buildout section. The "parts" directive lists the sections to execute. If "parts" is blank, then buildout will do nothing.
[buildout]
parts =
    env
    odoo
newest = false
So in our example, Buildout will execute the "[env]" and "[odoo]" section.
We have included some Buildout suggestions to reduce the time needed to download and build all required add-ons.
## Reduce Buildout download & build time
eggs-directory = /opt/buildout/eggs
download-cache = /opt/buildout/download-cache
abi-tag-eggs = true
We save a lot of time and disk space by sharing eggs between builds.
eggs-directorydefines the location where the shared eggs will be stored, so that they can be re-used with each build.download-cachedefines the location where all eggs will be downloaded, so that they dont have be downloaded again on each build.abi-tag-eggsABI tagging eggs makes Buildout run faster. Because ABI tags include Python version information, eggs for different Python versions are kept separate, causing the shared eggs directory for a given Python version to be smaller, making it faster to search for installed eggs.
More information on these options can be found here: http://www.buildout.org/en/latest/topics/optimizing.html
Next to this we have added some extra Buildout extension, to allow us to use some specific extra options in Buildout.
## Install build extensions
extensions =
    gp.vcsdevelop
    mr.developer
vcs-extend-develop = git+https://github.com/anybox/anybox.recipe.odoo@master#egg=a.r.odoo
vcs-update = true
gp.vcsdevelopis a extension that allows us to have more control over the VCS (GIT) aspect within Buildout. https://pypi.org/project/gp.vcsdevelop/mr.developeris a extension to ease the development of large projects with lots of packages.. https://pypi.org/project/mr.developer/
version section
[versions]
psutil = 2.2.1
The "[versions]" directive indicates the part where you freeze (pin) versions of eggs. psutil 2.2.1 is a required Python egg adviced for Odoo.
env section
[env]
recipe = gocept.recipe.env
The "[env]" directive will run a "gocept.recipe.env" recipe.
Recipes are the plugin mechanism provided by Buildout to add new functionalities to your building steps. Buildout recipes provide reusable Python modules for common configuration tasks. The most widely used recipes tend to provide low-level functions, like installing eggs or software distributions, creating configuration files, and so on.
The recipe will be made available for Buildout to use.
This recipe adds the functionality to use variables and values in other parts using the ${...} syntax.
odoo_vars section
To keep the management generic for other projects, we have added a "[odoo_vars]" section to group all information that can be used in the "[odoo]" section.
[odoo_vars]
## Odoo community
odoo_branch = 12.0
odoo_git = https://github.com/odoo/odoo.git
odoo_dir = ${buildout:parts-directory}/odoo

## Enterprise add-ons
enterprise_branch = 12.0
enterprise_git = https://github.com/odoo/enterprise.git
enterprise_dir = ${buildout:parts-directory}/enterprise

## OCA add-ons
oca_git = https://github.com/oca
oca_dir = ${buildout:parts-directory}/oca
oca_server-tools_branch=12.0
oca_web_branch=12.0

## Custom add-ons
custom_git = ssh://[email protected]:deltablue-cloud/odoo-buildout-custom.git
custom_dir = ${buildout:parts-directory}/custom
custom_branch = release/1.0
The "[odoo_vars]" directive is where we specify all add-ons code repository information. Typically this will be the "branch", "repository" and "installation directory".
For example:
odoo_branch = 12.0
odoo_git = https://github.com/odoo/odoo.git
odoo_dir = ${buildout:parts-directory}/odoo
These variables defines that Buildout will fetch the 12.0 branch from the public Odoo github repository and clone all code from the repo in the /odoo folder.
Sometimes it can be required get a specific versions of Odoo or for add-ons. Buildout offers the option to pin to specific GIT commit hashes.
[odoo_vars]
## Odoo community
odoo_branch = ec4ee14
odoo_git = https://github.com/odoo/odoo.git
odoo_dir = ${buildout:parts-directory}/odoo

## Enterprise add-ons
enterprise_branch = df85701
enterprise_git = https://github.com/odoo/enterprise.git
enterprise_dir = ${buildout:parts-directory}/enterprise
In this example, we have pinned the Odoo community repository to commit ec4ee14 and the Odoo enterprise repository to commit df85701.
Since Odoo Enterprise is hosted as a private Github repository, there are 2 ways to be able to download the private codebase:
- Add the main deploy key from the Odoo enterprise Github repository to your project
- Create a "mirror" for the Odoo enterprise on your own Git server, and use this mirror repository to check out the Odoo enterprise codebase.
Option 2 is the advised manner since you can use a separate deploy key per project and keep the main Odoo enterprise deploy key secure.
odoo section
## GIT settings to reduce the GIT download sizes
git-depth = 1
git-warn-sha-pins = False
update-git-submodules = always

## Odoo anybox recipe
recipe = anybox.recipe.odoo:server

release = ${odoo_vars:odoo_branch}

## Python eggs
eggs =
    psycogreen
    pyusb
    unidecode
    inouk.recipe.odoo_cmd
    PyWebDav
    nameparser
    phonenumbers
    pyOpenSSL
    num2words
    xlrd==1.0.0
    pyPDF2
    gevent

## Git install Odoo Community
version = git ${odoo_vars:odoo_git} ${odoo_vars:odoo_dir} ${odoo:release}

addons =
## GIT Enterprise add-ons
    git ${odoo_vars:enterprise_git} ${odoo_vars:enterprise_dir} ${odoo_vars:enterprise_branch}

## GIT OCA add-ons
    git ${odoo_vars:oca_git}/server-tools.git ${odoo_vars:oca_dir}/server-tools ${odoo_vars:oca_server-tools_branch}
    git ${odoo_vars:oca_git}/web.git ${odoo_vars:oca_dir}/web ${odoo_vars:oca_web_branch}

## GIT Custom add-ons
    git ${odoo_vars:custom_git} ${odoo_vars:custom_dir} ${odoo_vars:custom_branch}

## Odoo configuration file
## - db settings
options.db_host = 127.0.0.1
options.db_user = odoo
options.db_password = False

## - directory settings
options.data_dir = /var/lib/odoo

## - application settings
options.logfile = ${buildout:directory}/var/log/odoo/odoo-server.log
options.without_demo = True

## - system settings
options.proxy_mode = True
options.limit_time_cpu = 900
options.limit_time_real = 1200
options.workers = 2
options.max_cron_threads = 1

## Upgrade script
upgrade_script = odoo_upgrade.py run
The "[odoo]" directive is the main Odoo section, where all the Odoo specific configuration and tasks are defined.
recipe = anybox.recipe.odoo:server-> will run a number of installation steps to make sure the Odoo code is put in the right places. More information on the Odoo recipe can be found here: https://github.com/anybox/anybox.recipe.odooeggsis a list of i.e. python dependencies required for this specific Odoo setup. Buildout will install these. It is possible to pin the python dependencies to specific versions (example: Pillow==3.4.2) otherwise Buildout will take the latest released version.versiondefines the actual GIT clone command with the Odoo branch, installation directory, source defined in the "[odoo_vars]" section.addonsdefines the GIT clone command for all the additional branches, installation directories, sources specific defined per add-on in the "[odoo_vars]" section. In our example, we install from the private GIT Odoo Enterprise v12, a number of OCA public addons and our custom private addons.- The
optionsallows you to configure the Odoo configuration from within the Buildout.cfg. These options will be put in the "odoo.cfg" file which will be used by the Odoo server during runtime. The above is suggestion of possible best practices, more options can be found here: https://www.odoo.com/documentation/12.0/reference/cmdline.html#reference-cmdline upgrade_scriptdefine a script that can be run from CLI using./bin/upgrade_odoo. This is will tell Odoo to run the upgrade script that you have defined here.
Buildout.cfg provides the option to extend the configuration. This allows you to split the configuration in multiple files, which can extend and/or overwrite configuration defined in a lower level file.
Example of extending:
[buildout]
extends = common.cfg
Prepare a Customer Odoo setup with Buildout.cfg
Here are the steps :
- Create an empty "customer" GIT repository to store your buildout configuration
- Download buildout's
bootstrap-buildout.pyfrom https://bootstrap.pypa.io/bootstrap-buildout.py and put it the GIT folder.
wget https://raw.github.com/buildout/buildout/master/bootstrap/bootstrap.py
- Create a
buildout.cfgconfiguration file for the Odoo project Create a custombuildout.cfgfile for the customer specific dependencies. Feel free to split the file in multiple files, which can be extended by each other. - Add a
.gitignore(example) to exclude any unwanted files from GIT. - Commit and push to the "customer" GIT repository
You can always fork our buildout example: https://github.com/deltablue-cloud/odoo-buildout-sample
REMARK: In the sample we have commented out the "enterprise" and "custom" add-ons.
Create a new project on DeltaBlue.Cloud
Now that we a defined all the code dependencies, let's install our Odoo software.
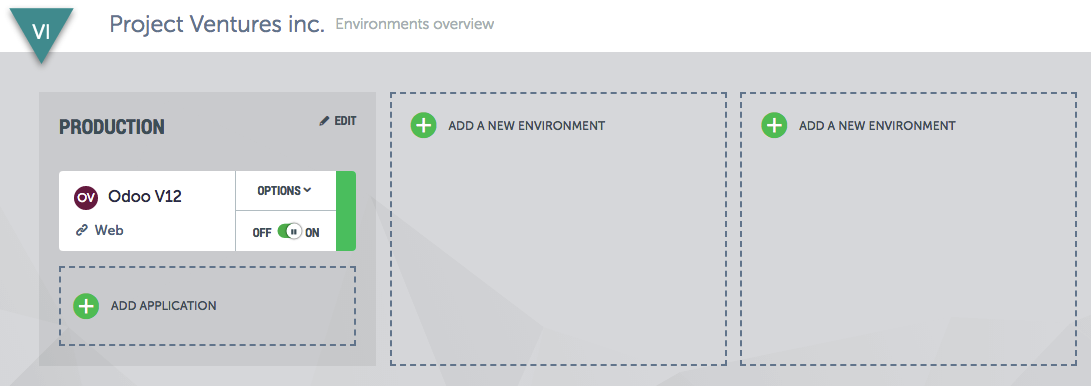
Step 1 - Create a project

Give the project a matching name, usually this will be the name of the customer.
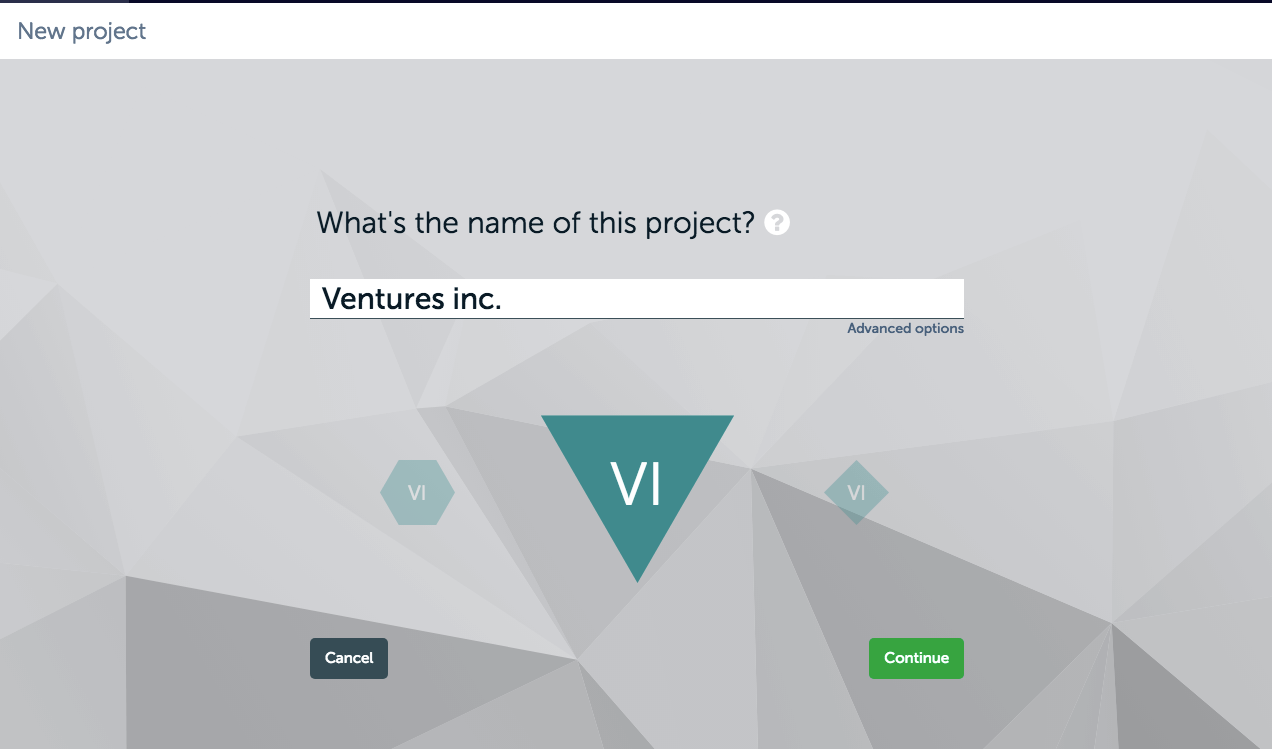
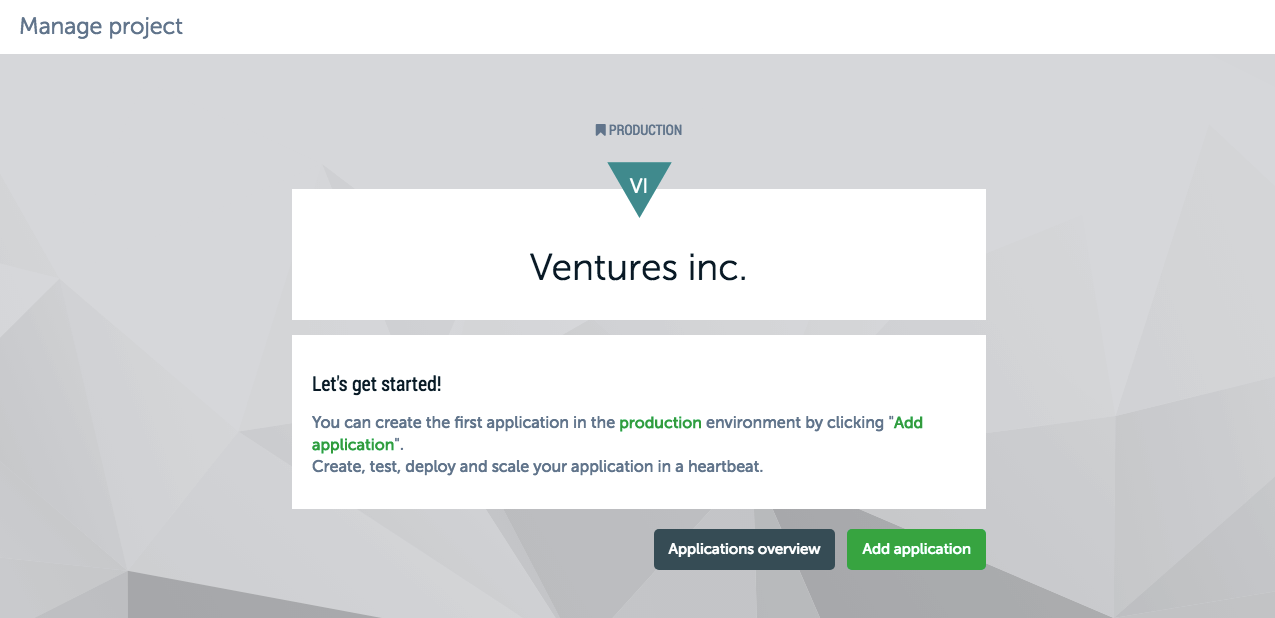
This will create a project with 1 environment: Production.
Step 2 - Create a Odoo application
Let's add a Odoo application to the environment.
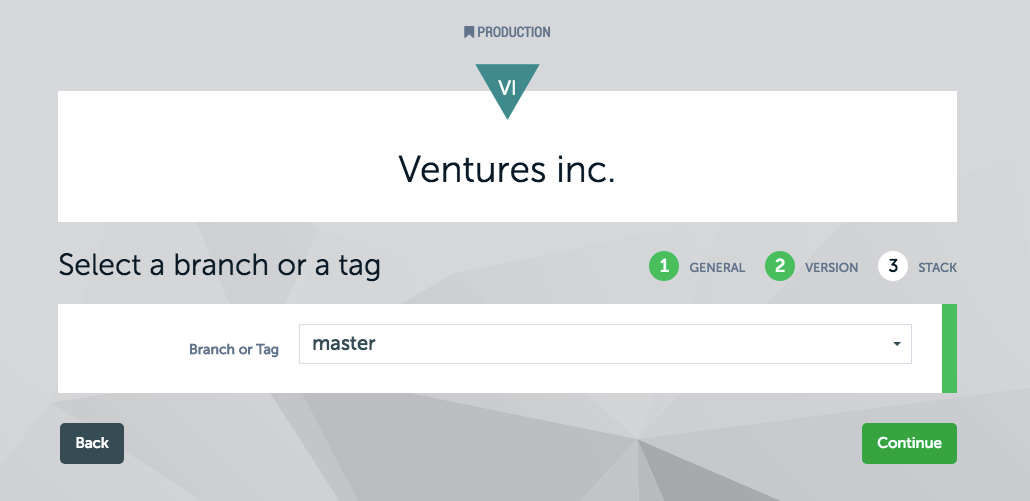
Set your GIT "customer" Buildout GIT repository
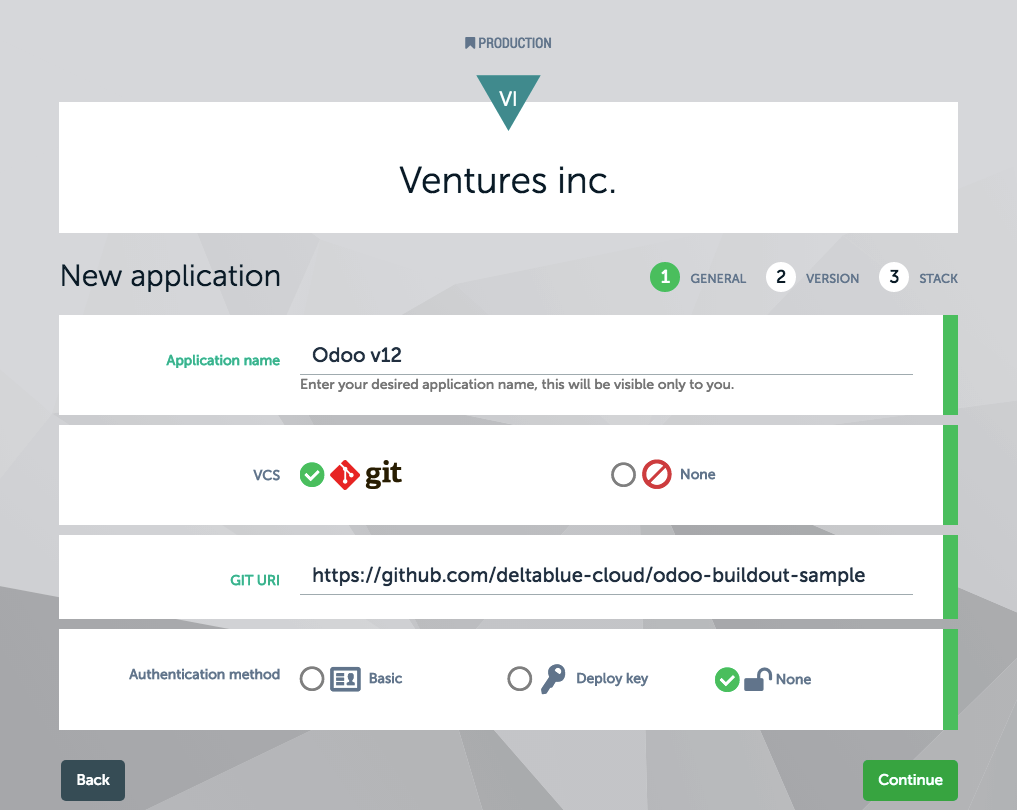
Select the desired branch
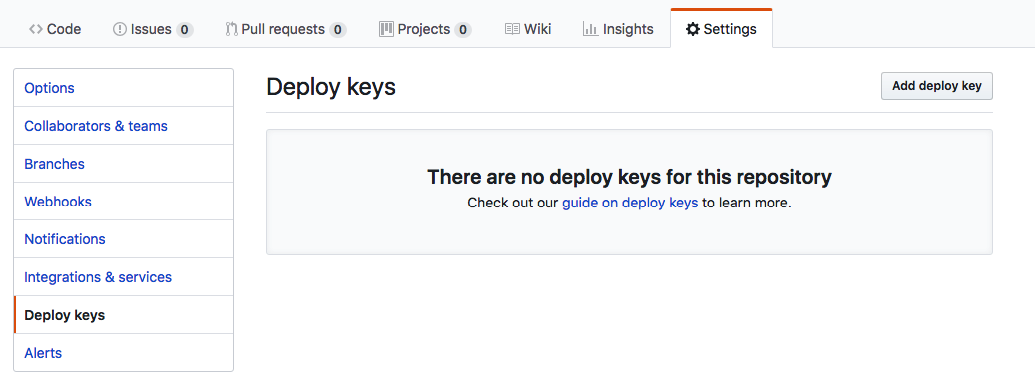
In case you want to use a private GIT repositories, add the deploy key generated by the platform to all the private GIT repositories (Odoo enterprise repo, custom add-on repo, ... ).
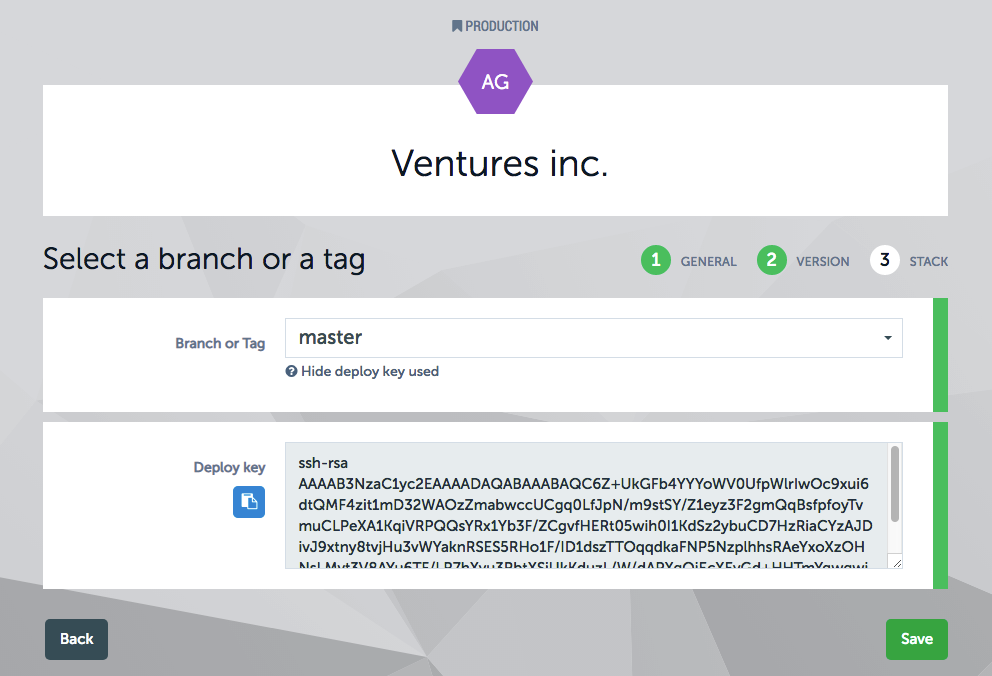
For Github repositories this can be done via: "Settings" >> "Deploy Keys"
For Gitlab repositories this can be done via: "Settings" >> "Repository" >> "Deploy Keys"

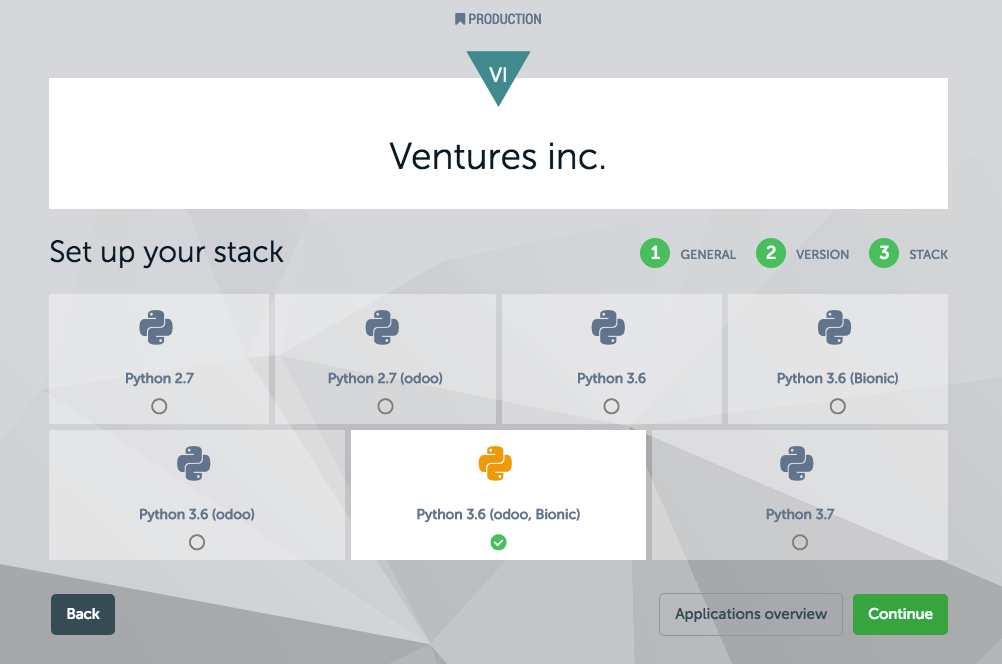
Select your Odoo stack
- Python 2.7 - Odoo / Python 3.6 - (Odoo, Bionic)
- Posgresql 9.x / Posgresql 10.x

Step 3 - Launch the application
During this step, the platform will provision the Odoo stack items, provide network connectivity and other required configuration.
Step 4 - Create dependencies scenario
Create a new scenario that will prepare the stack with all the system dependencies for Odoo like a system user, python requirements, the wkhtmltopdf installation, create a database users, ...
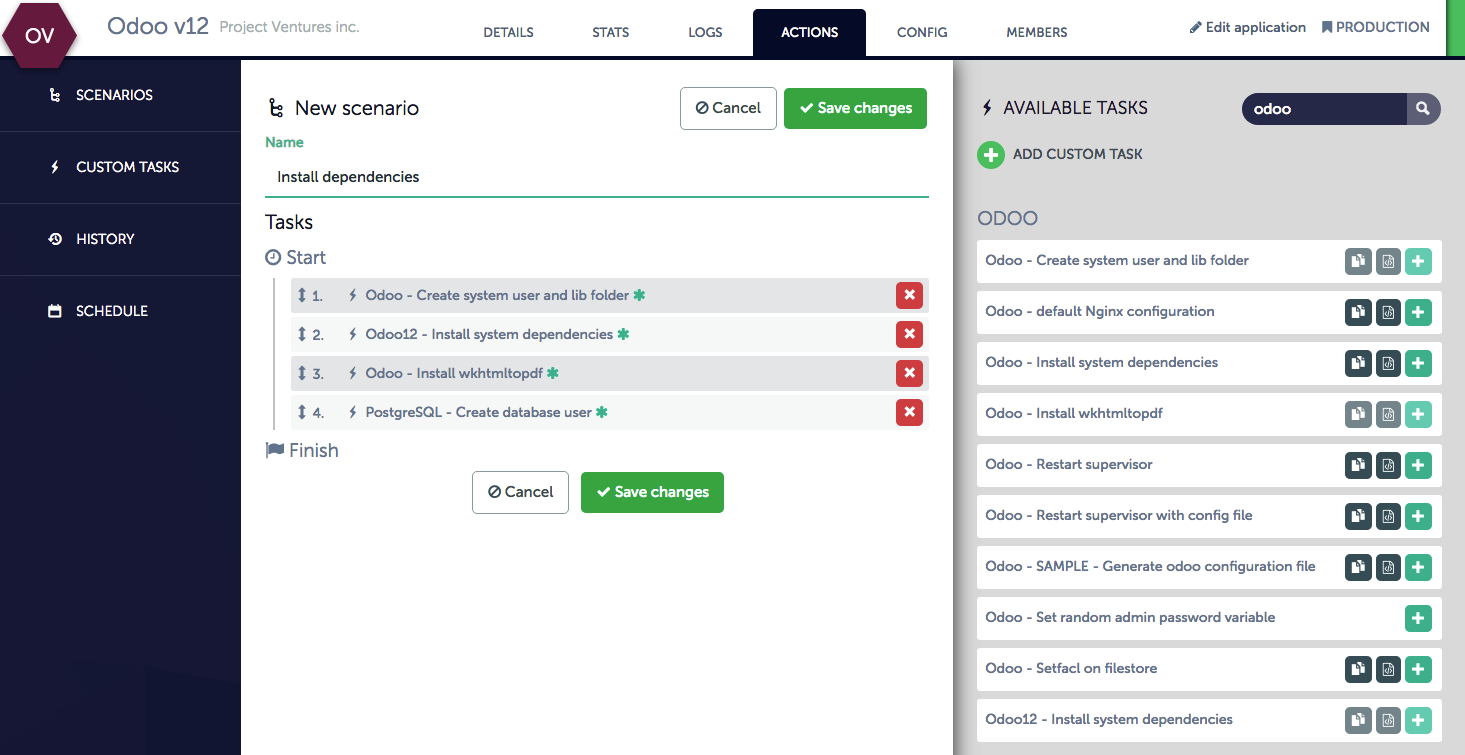
Task 1 - Create Odoo system user
This task will create Odoo system user and the directory that will contain the Odoo filestore information.
Task 2 - Install Odoo Python dependencies
This task will use apt-get install to install the necessary packages and tools required to build Odoo dependencies. Tools like the python dev-tools & Node.Js.
Task 3 - Install Wkhtmltopdf
The wkhtmltox package contains a set of open source command line tools that can render HTML into PDF and various image formats. In order to print PDF reports, Odoo will need the wkhtmltopdf tool.
Task 4 - Create PostgreSQL user
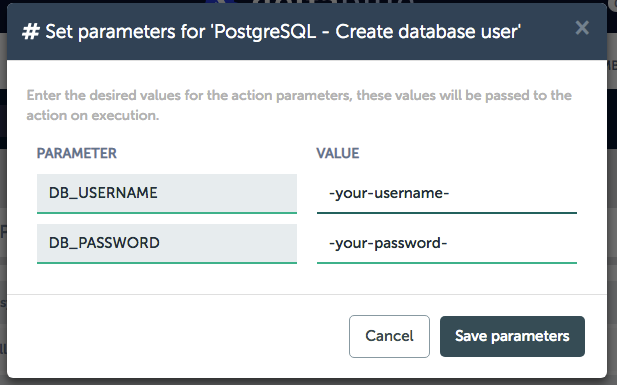
We have a PostgreSQL database service running, with this task we create a dedicated user with a password on the PostgreSQL service that can be used our Odoo setup.
Step 5 - Install dependencies
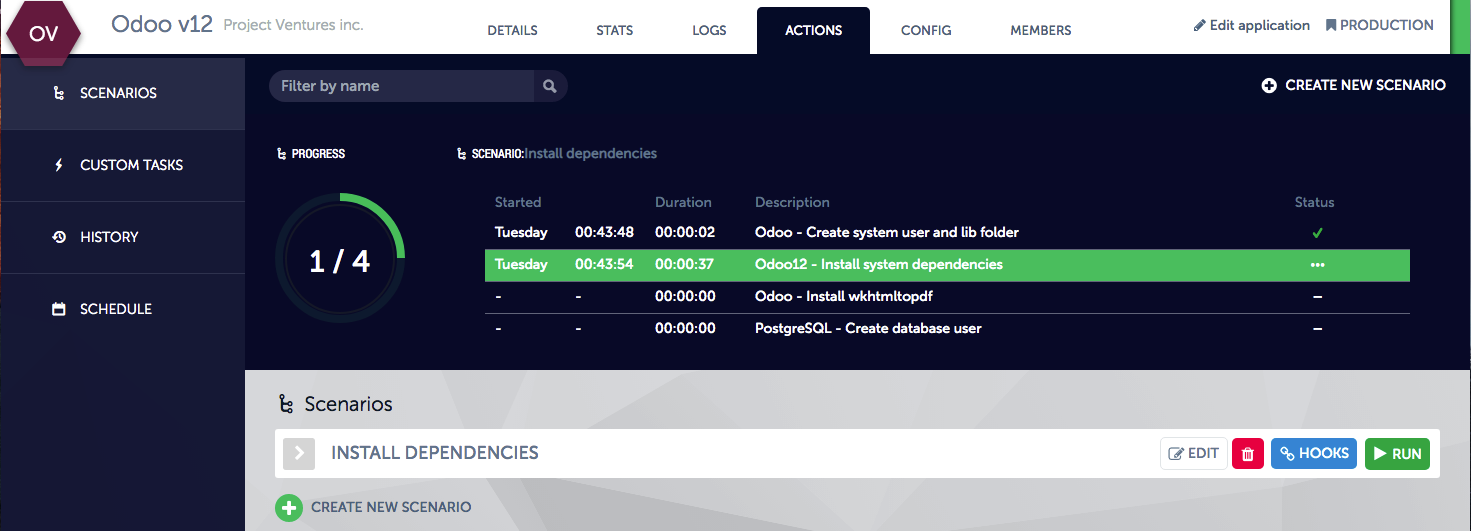
Now that we have defined all actions to install the dependencies, let's execute all actions by clicking the "run" button.
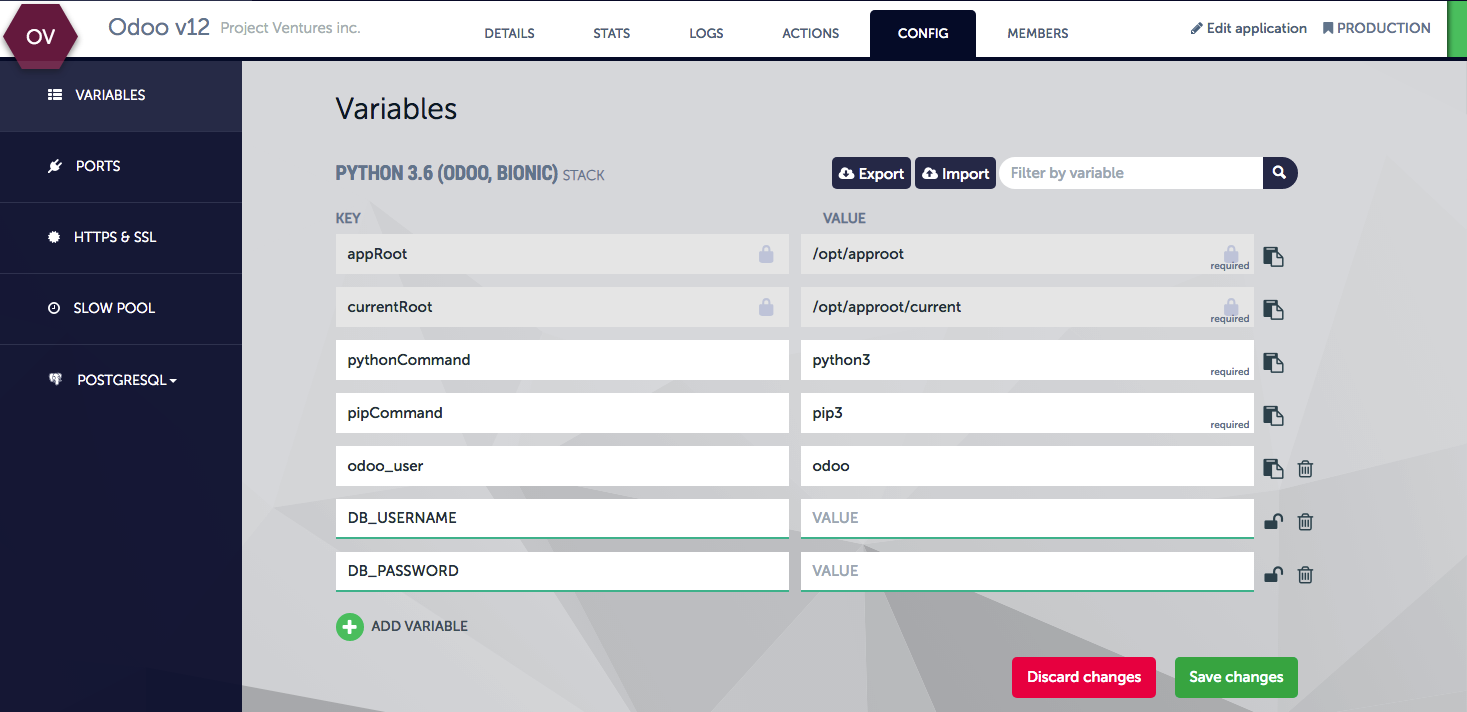
REMARK: Dont forget to add the necessary variables like DB_USERNAME & DB_PASSWORD to the Python stack item variables.
Step 6 - Create a Odoo deploy scenario
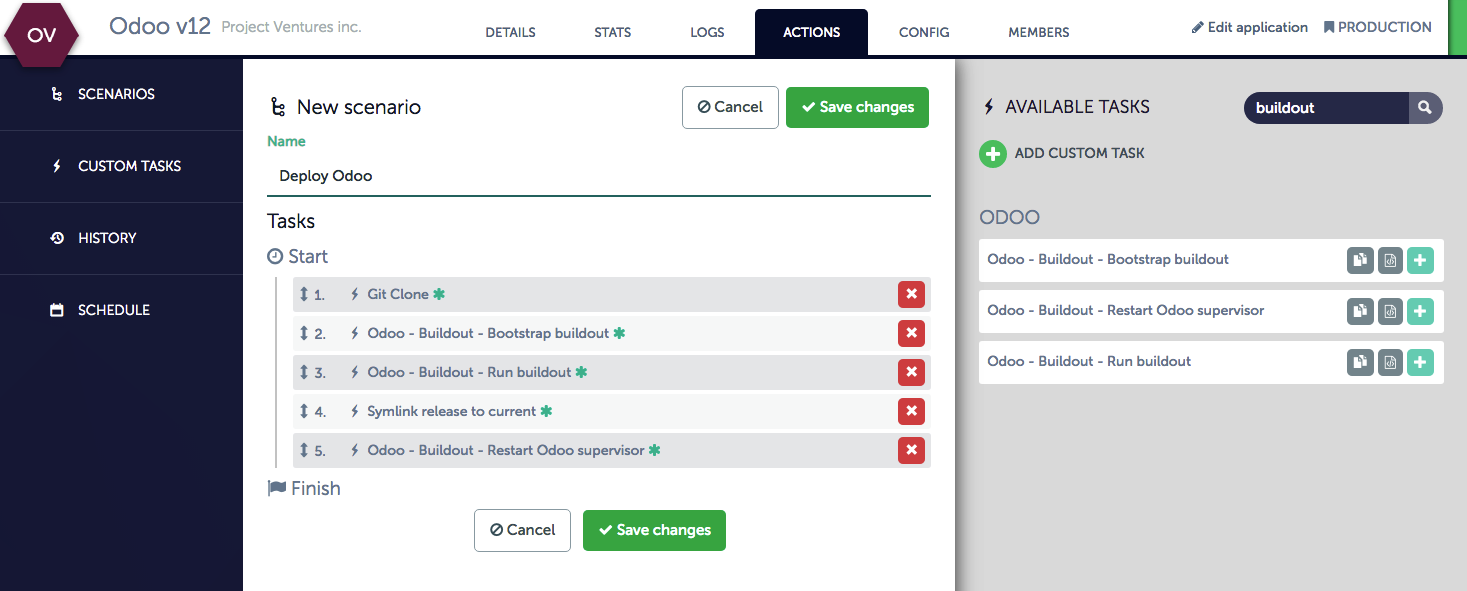
This scenario will deploy the Odoo code and all add-ons and start the server process. We will use use the buildout configuration, that is defined for this specific customer project, from the specific Git repository we have linked in the create application step.
Task 1 - Git clone our customer Buildout repository
We have created a "buildout.cfg" that contains all references to specific GIT repositories and perhaps even some custom Odoo configuration. To get all the Odoo code, including the Enterprise, OCA add-ons and the customer specific add-ons downloaded and build, we clone the buildout.cfg from the GIT repo that we have linked in the create application step.
During this task, the platform will create a new "build" folder where all the code will be downloaded.
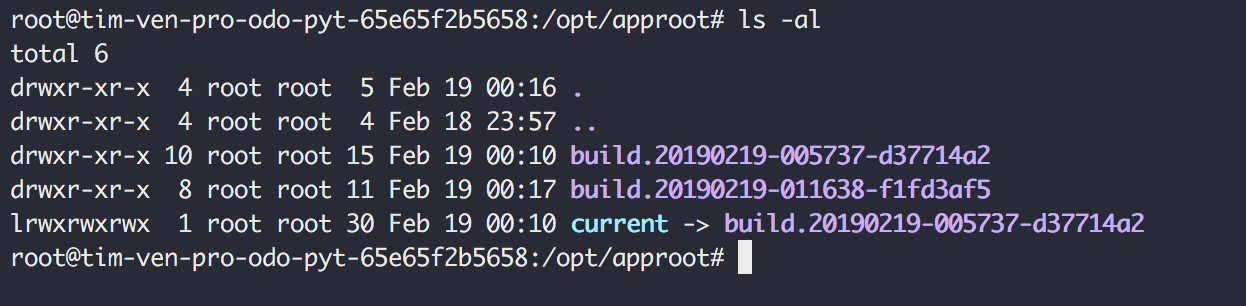
This is done to prevent that the current running code base would get overridden and provides in that manner a "build" versioning option on the Python instance. All next steps will be executed from within this build folder.
Task 2 - Boostrap buildout
To make sure buildout is able to run propperly, the bootstrap task will prepare the environment for the buildout install.
Task 3 - Run buildout
This task will do all the heavy lifting: pull all the code, install Odoo, build all add-on Python eggs, create a odoo configuration file, create a odoo bin command to start the service, ...
If we run the $> bin/buildout command, all specified requirements will be installed and the following directories are created:
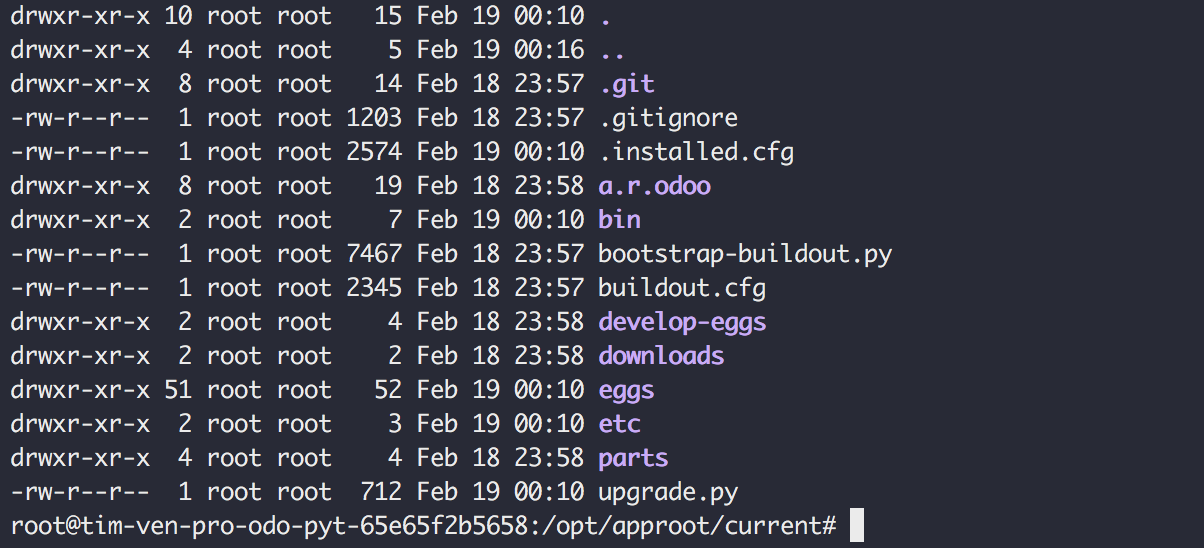
- bin: A directory that holds all important executables.
- develop-eggs: A directory that holds develop egg links.
- eggs: A directory that holds installed packages in egg format.
- etc: This directory will contain the generated
odoo.cfgfile, which will automatically contain all add-ons paths and the additionale configuration you might have specified in the buildout.cfg file - parts: A directory that provides a default location for installed parts.
REMARK: These folders should not be part of your GIT repository
This taks will take a long time to finish during the first deploy. Ranging from 5 minutes to 25 minutes or longer, depending on the amount of add-ons that are required for the customer specific Odoo setup. The next deploys should be shorter, since it will use the buildout cache for the build Python eggs.
Task 4 - Symlink release
During task 1, we have created a "build" folder where we put all code that are deployed during task 1,2 and 3. If all these task finished successfully, we mark the latest build folder a "release" by symlinking them as "current".
This is very helpful, since if you would need to review the active code base you can goto the "current" folder on the Python instance.
cd /opt/approot/current
If one of the actions would have failed, this "symlinking" task would not have been executed, keeping your active, running code untouched under /opt/approot/current.
Task 5 - Configure & restart Odoo
Odoo is a Python process that runs continuously but in occasion that an error occurs, we want to make sure that the process gets restarted automatically. For this we use "Supervisord" as our process manager.
We have configured supervisor to start the bin/start_odoo command that is generated by buildout.
Example of the supervisord configuration:
 [program:odoo]
 command=bin/start_odoo --db_host=127.0.0.1 --db_user={{DB_USERNAME}} --db_password={{DB_PASSWORD}}
 numprocs=1
 directory={{currentRoot}}
 stdout_logfile=/var/log/odoo/odoo-server.log
 redirect_stderr=true
 autostart=true
 autorestart=true
 stopsignal=KILL
 user=odoo
- command: Supervisord will run the
start_odoocommand in thebinfolder and pass the postgres configuration as parameters to Odoo. - numprocs: Supervisor will start as many instances of this program as set by numprocs, in our case we only want to start 1 Odoo instance.
- directory: A file path representing a directory from where supervisord should execute the command.
- stdout_logfile: The location where the Odoo server output will be stored in a log file.
- autostart: We want to make sure that as soon a supervisord is started, that the Odoo process also gets started. This is useful for when the Python instance has to reboot, in this case the Odoo process will get started automatically.
- autorestart: Specifies if supervisord should automatically restart a process if it exits when it is in the RUNNING state. This will make sure that Odoo process will get restarted in case an Odoo error would occur.
- stopsignal: When we tell Supervisor to stop the Odoo process, this signal will be send to the Odoo process to kill the program, to cause a clean exit of the Odoo process.
- user: This is the system user that will execute the command, in our case we to use the "odoo" user, to make sure any files that are generated have the correct privileges and access control.
Supervisord support much more configuration parameters, which can be found on http://supervisord.org/configuration.html
Step 6 - Run deploy
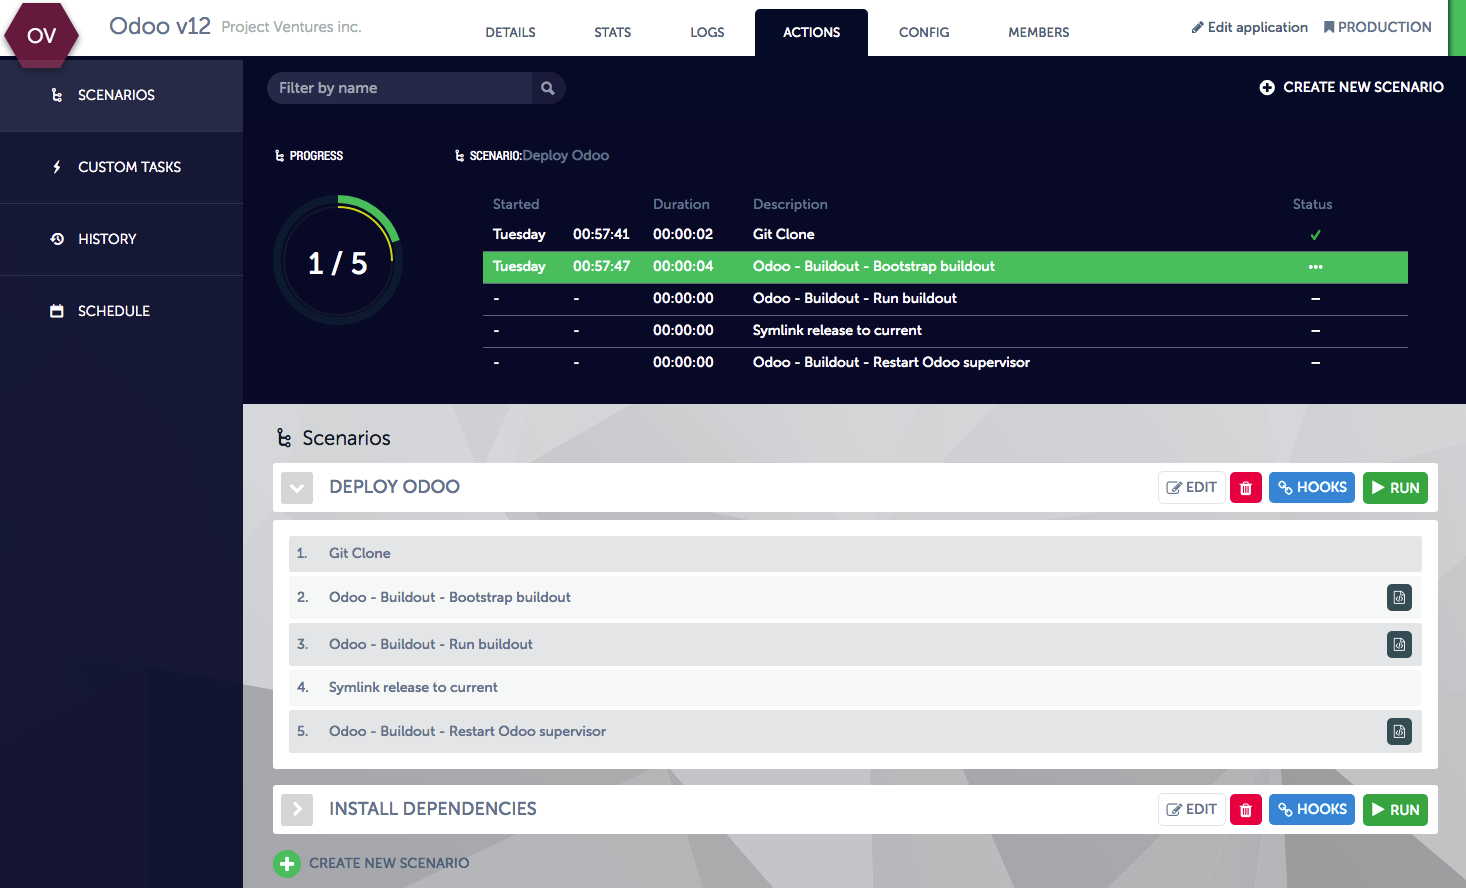
The "Deploy scenario" allows you to release any code changes in a safe and highly automated way, and keep the Odoo application running with no downtime. In case of an error in actions 1,2 or 3 would occur, your running Odoo is not impacted. You could run this scenario as much as needed.
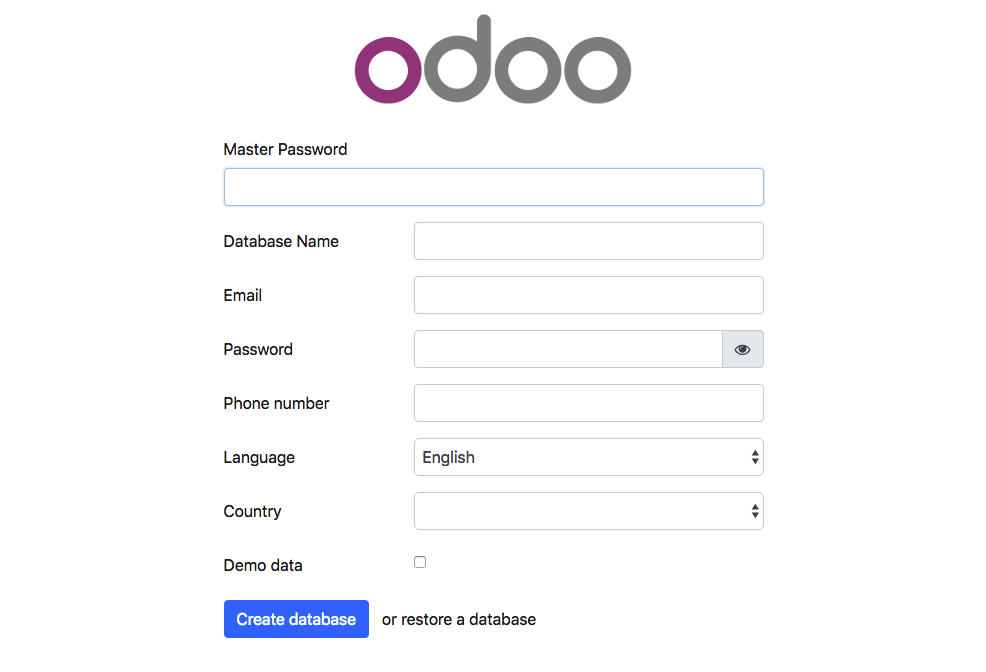
Test the Odoo application
By following the steps above, you have a Odoo 12 application up-and-running, where you can start further configure the Odoo modules.
Open your browser and type: http://<delta_blue_app_url>
Assuming the installation is successful, a screen similar to the following will appear:
Conclusion
That’s it!
This tutorial walked you through the installation of Odoo 12 on DeltaBlue Cloud. We wanted to show how you can streamline your installation & deployment workflow by using "Buildout" and DeltaBlue for advanced customer projects where multiple add-ons are required .
If you have questions feel free to contact us.
Let's talk!
Have a question, need advice, or just want to learn more about what we offer? Our team is here to help! Whether you're exploring solutions, planning your next move, or already deep into a project. We'll connect you with the right experts to give you practical, honest input tailored to your situation.
From technical questions to partnership opportunities, we're all ears. Drop us a line and let's see where we can make a difference.
Contact us