x min read
Node.js is a lean, fast, open-source, cross-platform JavaScript runtime environment that can be used to build powerful web applications, API's and desktop applications. It runs as a single-threaded process where, through event loops, it can handle events/connections/logic by firing JavaScript callback functions.
Node.js applications use the Google Chrome V8 JavaScript engine to execute Javascript functions. You can use any language that transpiles to JavaScript, for example TypeScript and CoffeeScript. Node.js comes with a large package library and a commandline package manager called NPM. The node package manager, is part of the standard Node.js installation.
The Node.js runtime is commonly used in several frameworks and tools like Single Page Applications (AngularJS, ReactJS, VueJS), building API's (using the "express" module) or Static Site Generators (Gatsby or Nuxt).
Goal of this tutorial
In this tutorial we explain step by how to deploy a Node.js application from GIT, install all requirements using NPM and run the application in a stable way using a process manager.
Goals:
- Run a Node.js-based application.
- If the node app crashes (which it will), it must restart.
- The node app must start after a reboot of the machine.
- It must be secured with SSL.
NPM package.json explained
Before we get started, some additional information on how the dependency management for Node.js works.
Node Package Manager or NPM is a CLI tool that makes it very easy to manage dependencies for Node.js applications. It uses a config file to specify all dependencies, code repositories and helper scripts. The NPM configuration is stored in a JSON file.
A package.json example
{
    "name": "universal-react-delta-blue",
    "version": "1.0.0",
    "description": "Universal React.js starter with the minimum possible code",
    "main": "lib/server.js",
    "scripts": {
        "build": "./node_modules/babel-cli/bin/babel.js src --out-dir lib --plugins transform-react-jsx --presets es2015",
        "bundle": "./node_modules/browserify/bin/cmd.js lib/client.js -o public/js/bundle.js",
        "start": "npm run build && npm run bundle && node lib/server.js"
    },
    "author": "DeltaBlue",
    "license": "BSD",
    "dependencies": {
        "ejs": "^2.6.1",
        "express": "^4.16.4",
        "react": "^16.8.3",
        "react-dom": "^16.8.3"
    },
    "devDependencies": {
        "babel-cli": "^6.26.0"
    }
}
Properties breakdown:
- name sets the application/package name
- version indicates the current version of the application/package
- description is a brief description of the application/package
- author lists the package author name
- scripts defines a set of node scripts you can run, using their name as sort of shortcut. Example:
npm run build - dependencies sets a list of npm packages that will be installed as dependencies
- devDependencies sets a list of npm packages that will be installed as development dependencies
More information about all available properties can be found on https://docs.npmjs.com/files/package.json
The package.json file makes it easy to include modules in your application or have other applications use your package.
For the purpose of this tutorial, we have created a simple React Node.js Hello World Application, which can found on our Github page: https://github.com/deltablue-cloud/nodejs-react-hello-world
Let's get started to get our Node.js application up-and-running ....
Provision a Node.js instance
We need a Node.js instance to run our application, so we start by creating a new project.
Step 1 - Create a project

Give the project a matching name
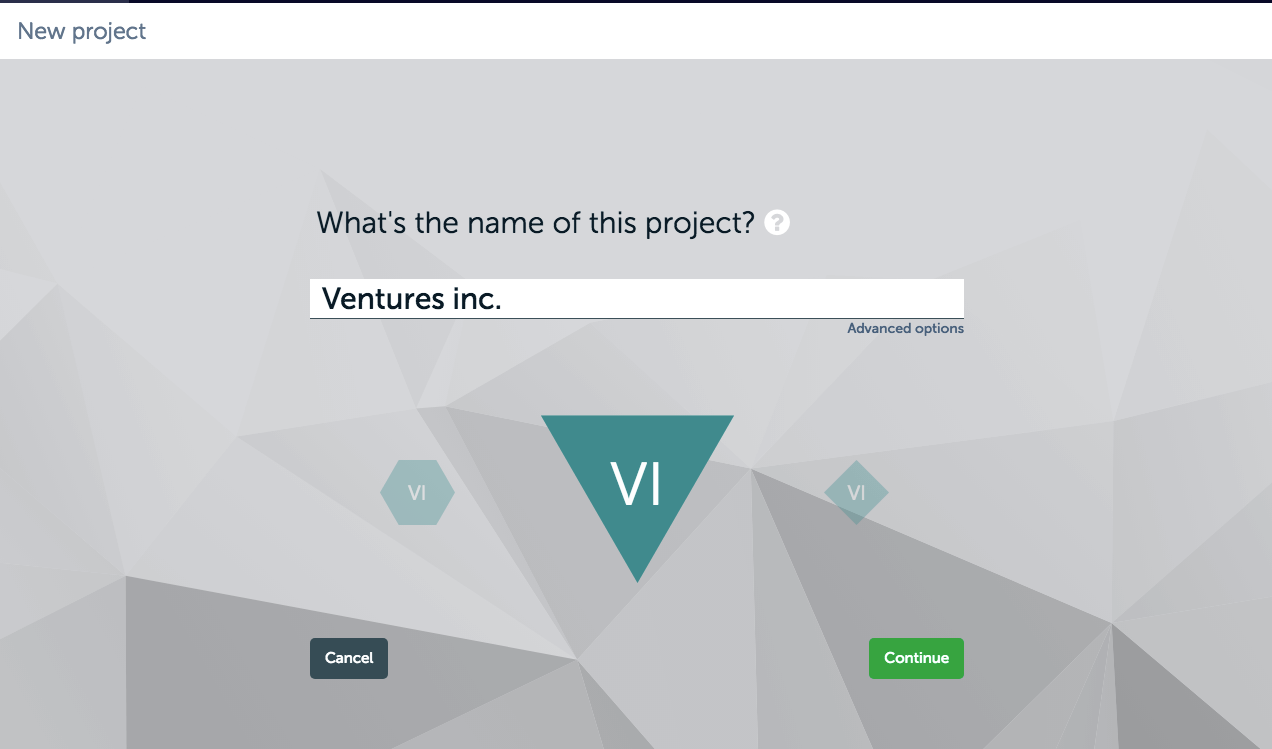
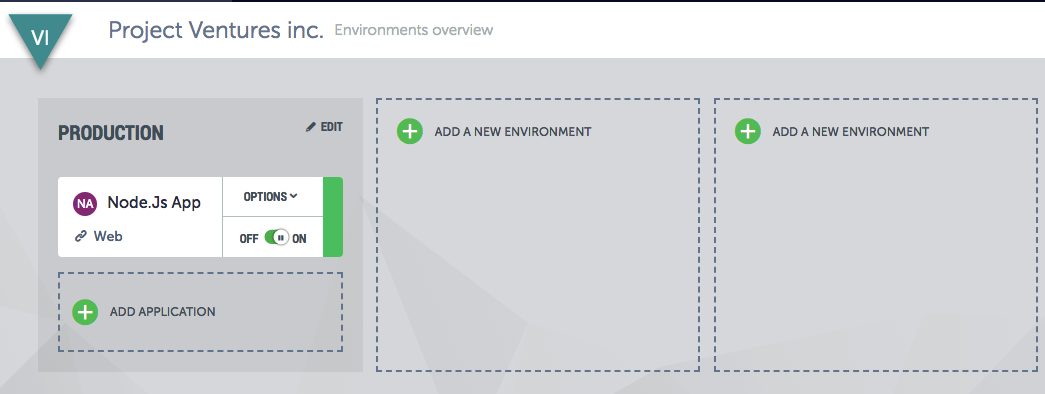
This will create a project with 1 environment: Production.
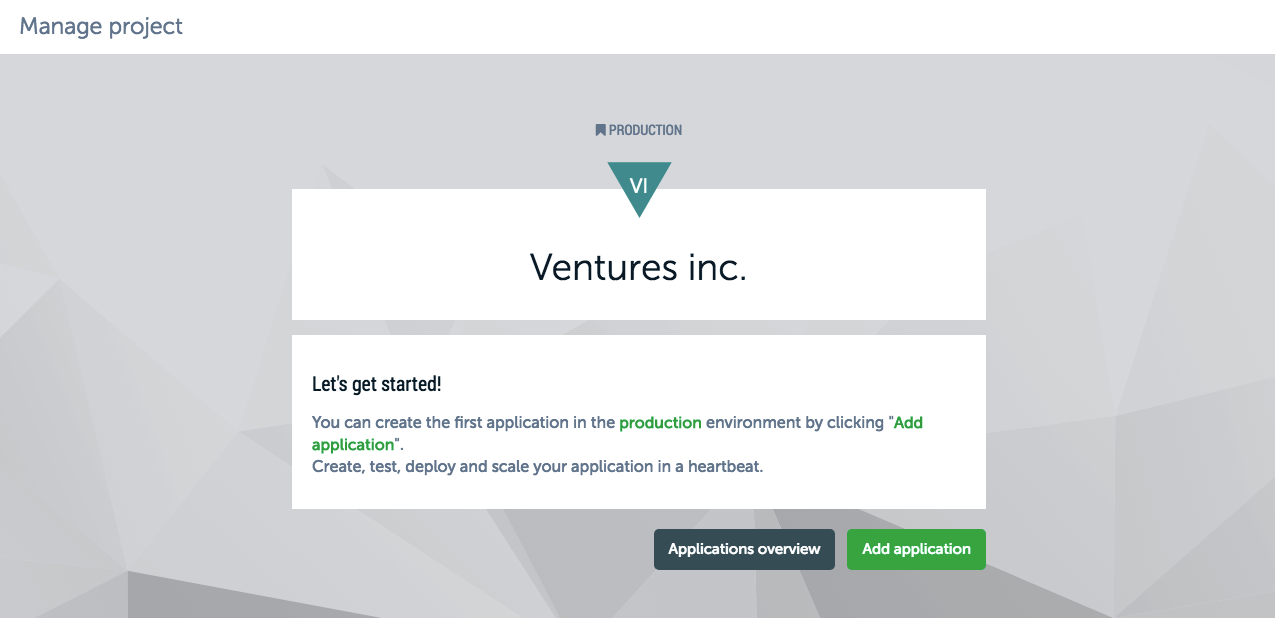
Step 2 - Create the Sample app
Press the "Add application" button and enter your desired application name.
Next set your GIT repository.
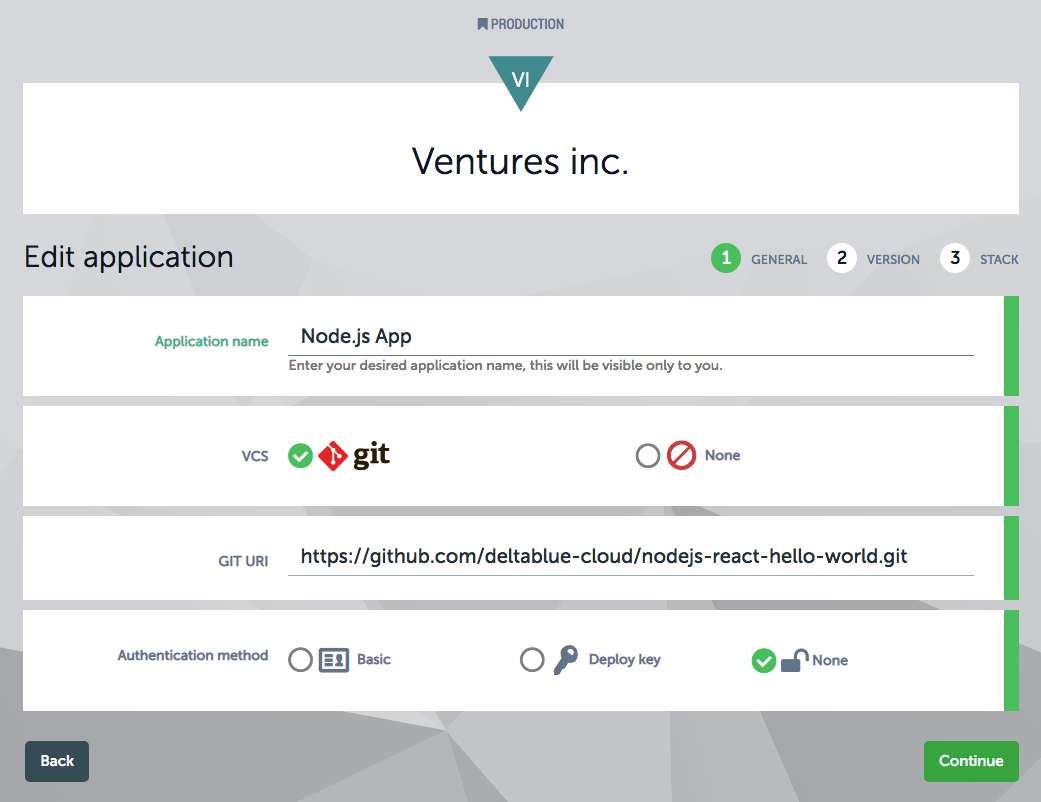
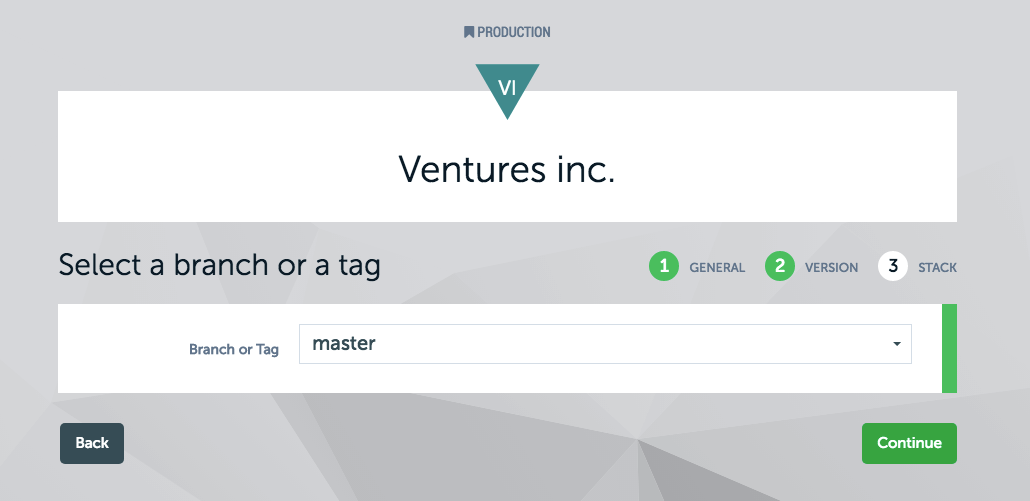
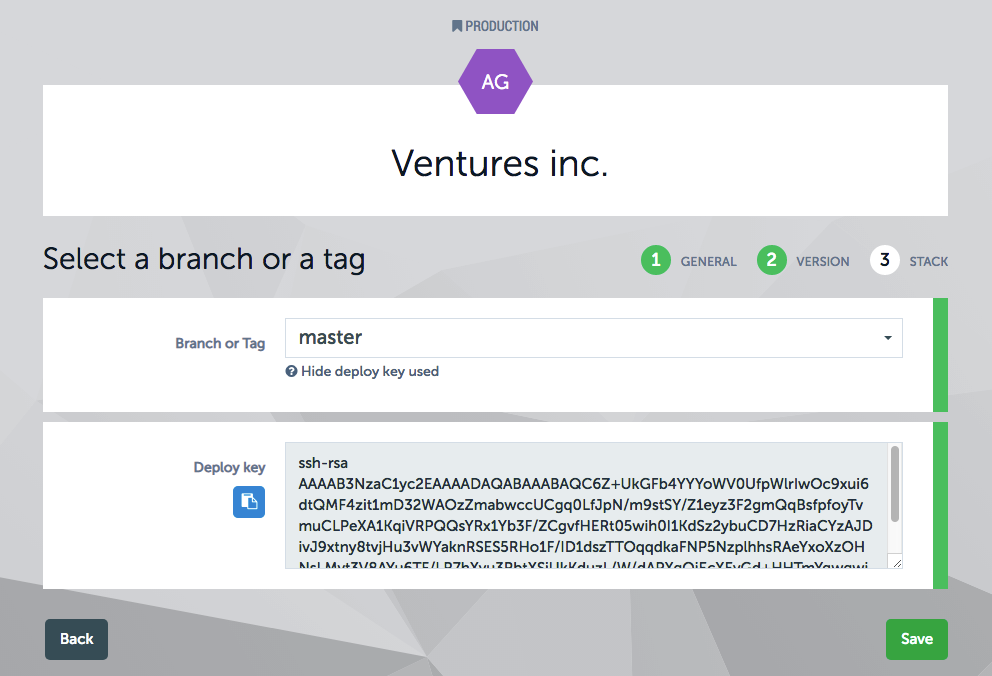
Select the desired branch or tag from the repository.
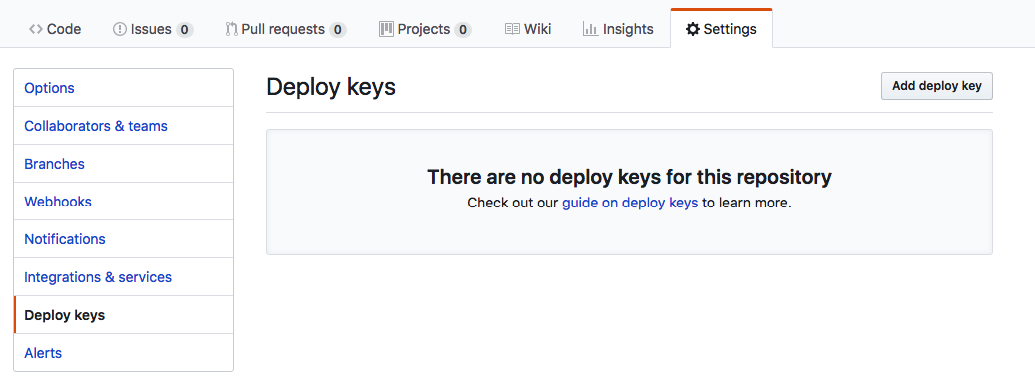
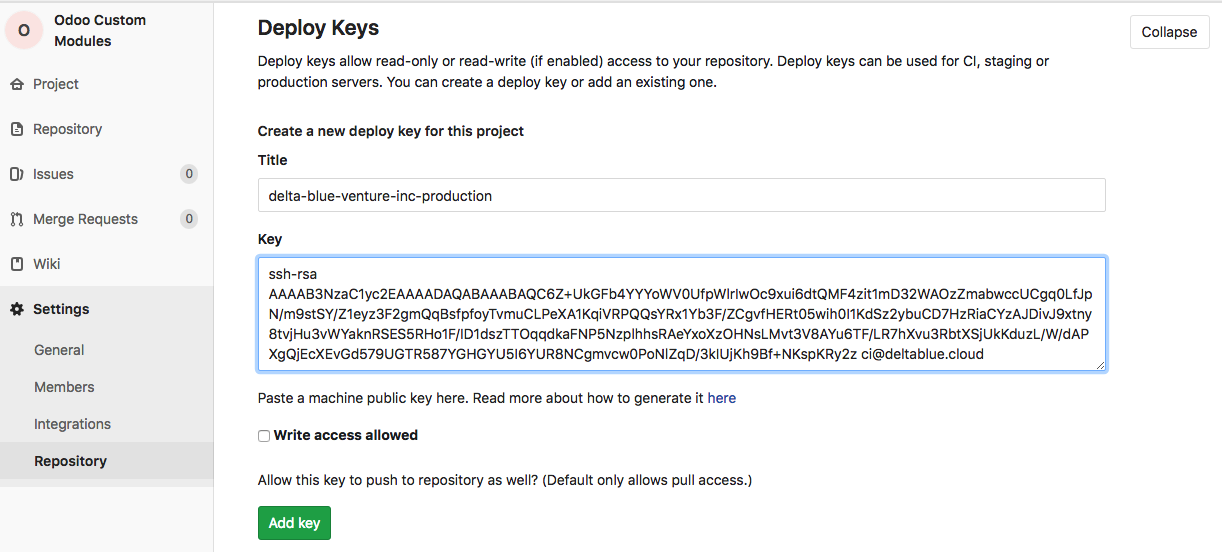
In case you want to use a private GIT repositories, add the deploy key generated by the platform to all the private GIT repositories
For Github repositories this can be done via: "Settings" >> "Deploy Keys"
For Gitlab repositories this can be done via: "Settings" >> "Repository" >> "Deploy Keys"
Select your desired Node.js version and add other required stack items (if needed).
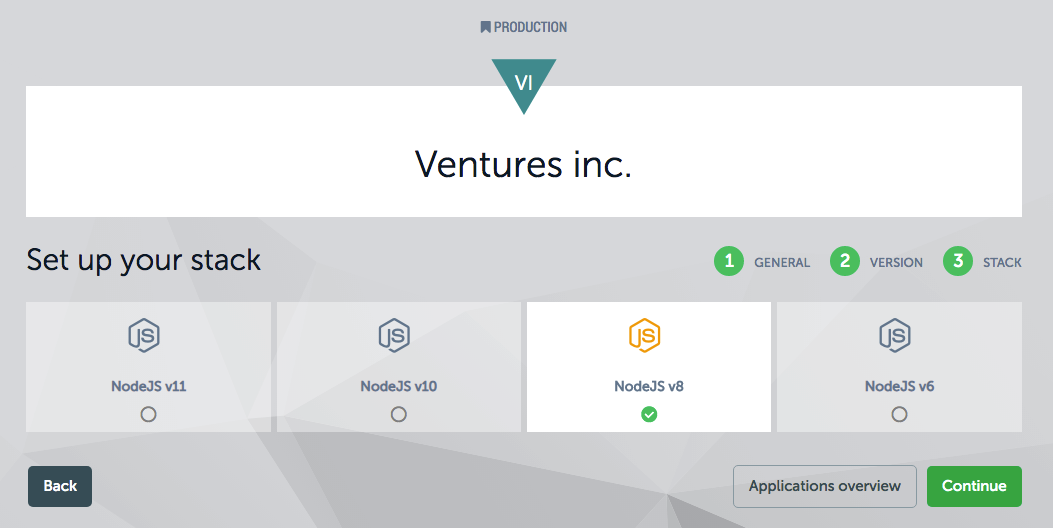
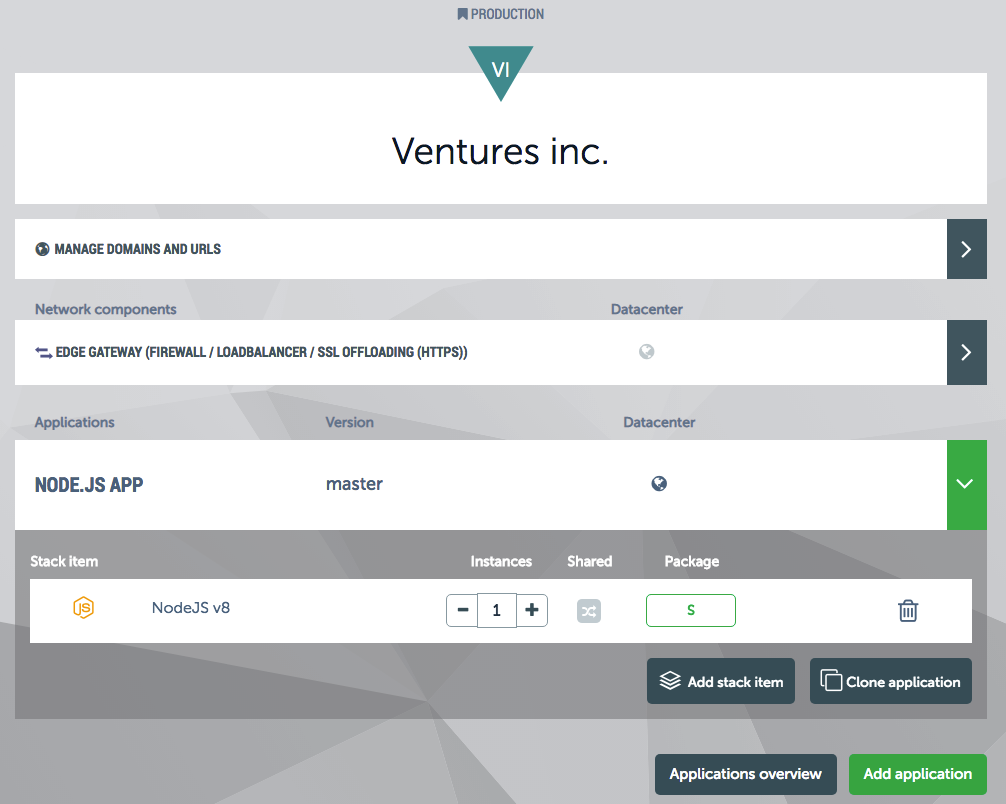
Step 3 - Launch the app
During this step, the platform will provision the Node.js stack item, provide network connectivity and other required configuration. As a result you will get a running container with Node.js and NPM pre-installed.
Deploy your code
Now that we have our instance ready, we want to get our code installed.
Create a deploy scenario
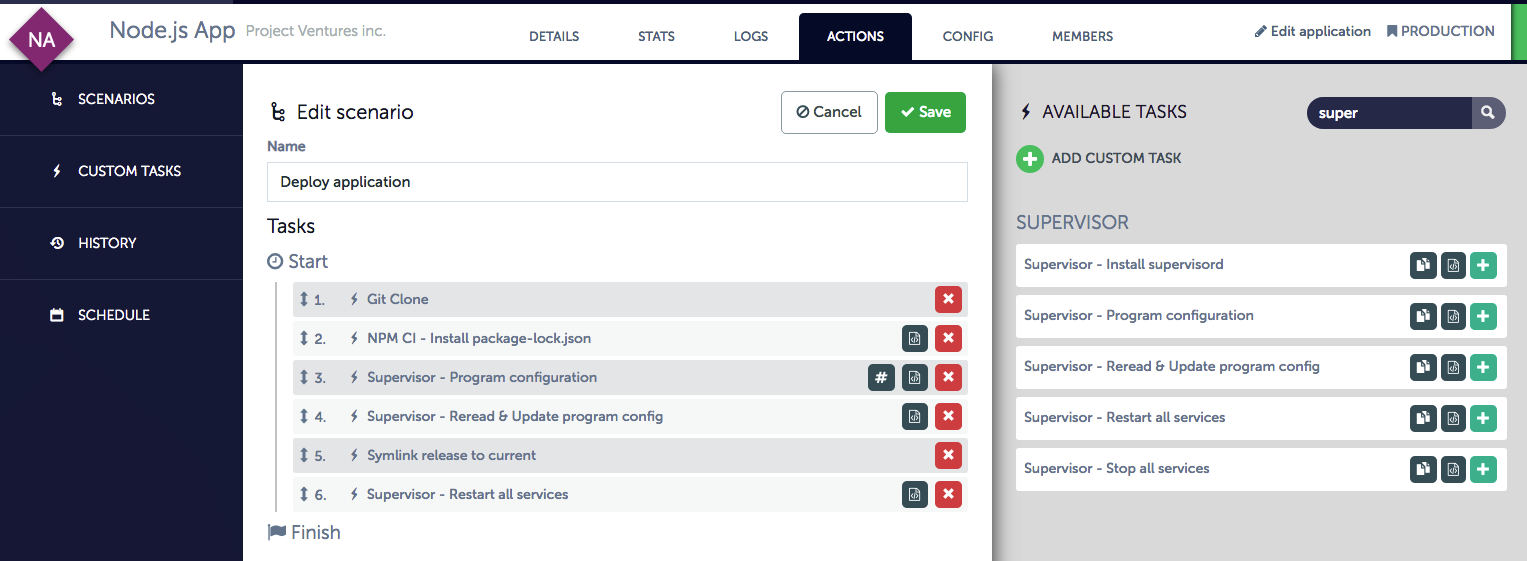
This scenario will deploy the Node.js code, including all required packages/modules and start the node process.
Task 1 - Git clone the application repository
We have created a dedicated GIT repository that contains all code for our application, but also the package.json file for all the application dependencies. To get the Node.js application code downloaded and built, we clone the GIT repo in the Node.js stack item. This task will take the GIT repository that we configured in the create application step 2.
During this task, the platform will create a new "build" folder where all the code will be downloaded.
This is done to prevent that the current running codebase would get overridden and provides in that manner a "build" versioning option on the Node.js instance.
All next steps will be executed from within this build folder.
Task 2 - NPM install dependencies
This task will will install all the modules that are required for the application using the NPM package manager.
All modules defined in the package.json file will be downloaded in the node_modules folder.
Typically this will run the following command:
npm install
Depending on the amount of modules this can take a number of minutes to finalize.
REMARK: The node_modules folders should not be part of your GIT repository.
npm install will install the versions of the modules that are defined in the package.json file.
If these versions are set to the latest or not pinned to a specific version, NPM can potentially install a newer version then the previous build.
This could break your application because of changes in newer versions of node modules.
Since npm 5.7.x, there is a faster and more controlled way to install modules: npm ci. This command will bypass the packages in package.json and instead will install modules from a package’s lockfile.
This ensures reproducible builds — you are getting exactly what you expect on every install and as a bonus it will be quicker.
More information about npm ci be found here: https://blog.npmjs.org/post/171556855892/introducing-npm-ci-for-faster-more-reliable
Task 3 - Configure a program for Supervisor
Node.js is a process that runs continuously but in occasion that an error occurs, we want to make sure that the process gets restarted automatically. For this we use "Supervisord" as our process manager.
In the platform there is a default Supervisor configuration task, that can be parameterised.
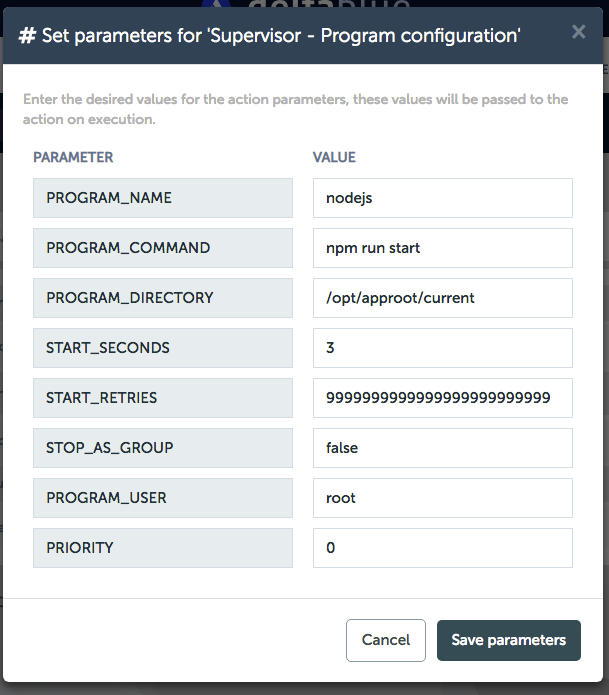
Example of the Supervisord configuration:
[program:{{PROGRAM_NAME}}]
command={{PROGRAM_COMMAND}}
autostart=true
autorestart=true
startsecs={{START_SECONDS}}
startretries={{START_RETRIES}}
numprocs=1
directory={{PROGRAM_DIRECTORY}}
stdout_logfile=/var/log/{{PROGRAM_NAME}}.out.log
redirect_stderr=true
stopsignal=KILL
user={{PROGRAM_USER}}
stopasgroup={{STOP_AS_GROUP}}
priority={{PRIORITY}}
Breakdown of the parameters:
- PROGRAM_NAME: the program name is a unique identifier in the list of Supervisord programs, since Supervisord can run multiple programs. It helps to target a specific program by its name.
- PROGRAM_COMMAND: Supervisord will run a command to start a process. For Node.js this would typically be something like:
npm run startornode lib/server.js - autostart: We want to make sure that as soon a supervisord is started, that the Node.js process also gets started. This is useful for when the Node.js instance has to reboot, in this case the Node.js process will get started automatically.
- autorestart: Specifies if supervisord should automatically restart a process if it exits when it is in the RUNNING state. This will make sure Node.js process will get restarted in case a Node.js error would occur.
- START_SECONDS: The amount of seconds to wait before the command is run.
- START_RETRIES: The amount of times a program is allowed to try to restart, after a crash or error.
- numprocs: Supervisor will start as many instances of this program as set by the "numprocs" property. In our case we only want to start 1 Node.js instance.
- directory: A file path representing a directory from where supervisord should execute the command.
- stdout_logfile: The location where the Node.js application output will be stored in a log file. This is typically the Node.js debug and/or error output.
- stopsignal: When we tell Supervisor to stop the Node.js process, this signal will be send to the Node.js process to kill the program, to cause a clean exit of the Node.js process.
- user: This is the system user that will execute the command, in our case we to use the "root" user, to make sure any files that are generated have the correct privileges and access control.
- priority:
Supervisord support much more configuration parameters, which can be found on http://supervisord.org/configuration.html
Task 4 - Supervisor - Reread & Update program configuration
Since Supervisord will be managing our process, it is not advised that it restarts itself everytime somebody is editing a configuration file. To keep control of when a program configuration gets loaded in Supervisord and it updates the running program, there are 2 commands available:
- supervisorctl reread: This command only updates the changes. It does not restart any of the managed programs, even if their configuration has changed. New program configurations will not be started by themselves neither.
- supervisorctl update: Restarts the program(s) whose configuration has changed.
Note: After the update command, new application configurations becomes available to start, but do not start automatically until the supervisor service restarts or system reboots (even if autostart option is not disabled).
Task 5 - Symlink release
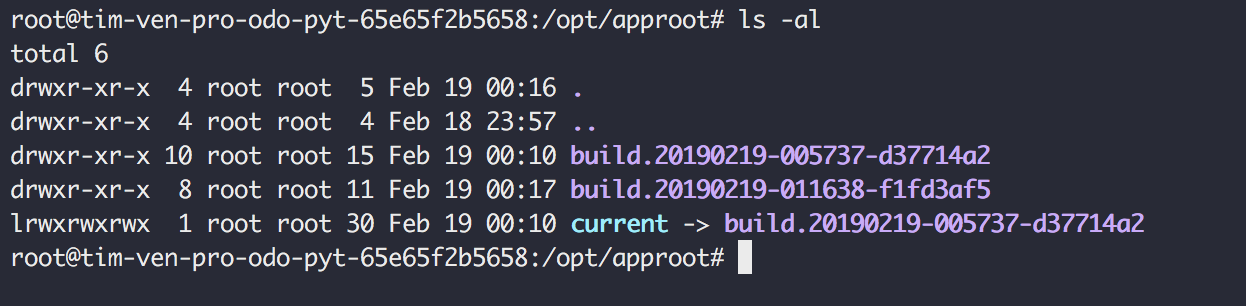
During task 1, we have created a "build" folder where we put all code that is deployed in the others actions. If all these actions finish successfully, the platform will mark the latest build folder as "release" by symlinking them as "current".
If you would need to review the active codebase you can goto the "current" folder on the Node.js instance.
cd /opt/approot/current
If one of the actions would have failed, this "symlinking" task would not have been executed, keeping your active, running code untouched safe in /opt/approot/current.
You can still go into the "failed" build folder to see what went wrong or do manual actions via SSH.
Task 6 - Supervisor - Restart all services
The supervisor restart task will restart a specific "program" or "all", without making configuration changes available. It stops, and re-starts all or specific managed applications. If you have created a new or changed configuration, none of the configuration changes will be made available if you would only simply restart.
We have add this task to ensure our Node.js process is restarted and has loaded all the latest code changes.
If you would like to know if the program is still running, run the following command via SSH:
supervisorctl status
Step 4 - Run deploy
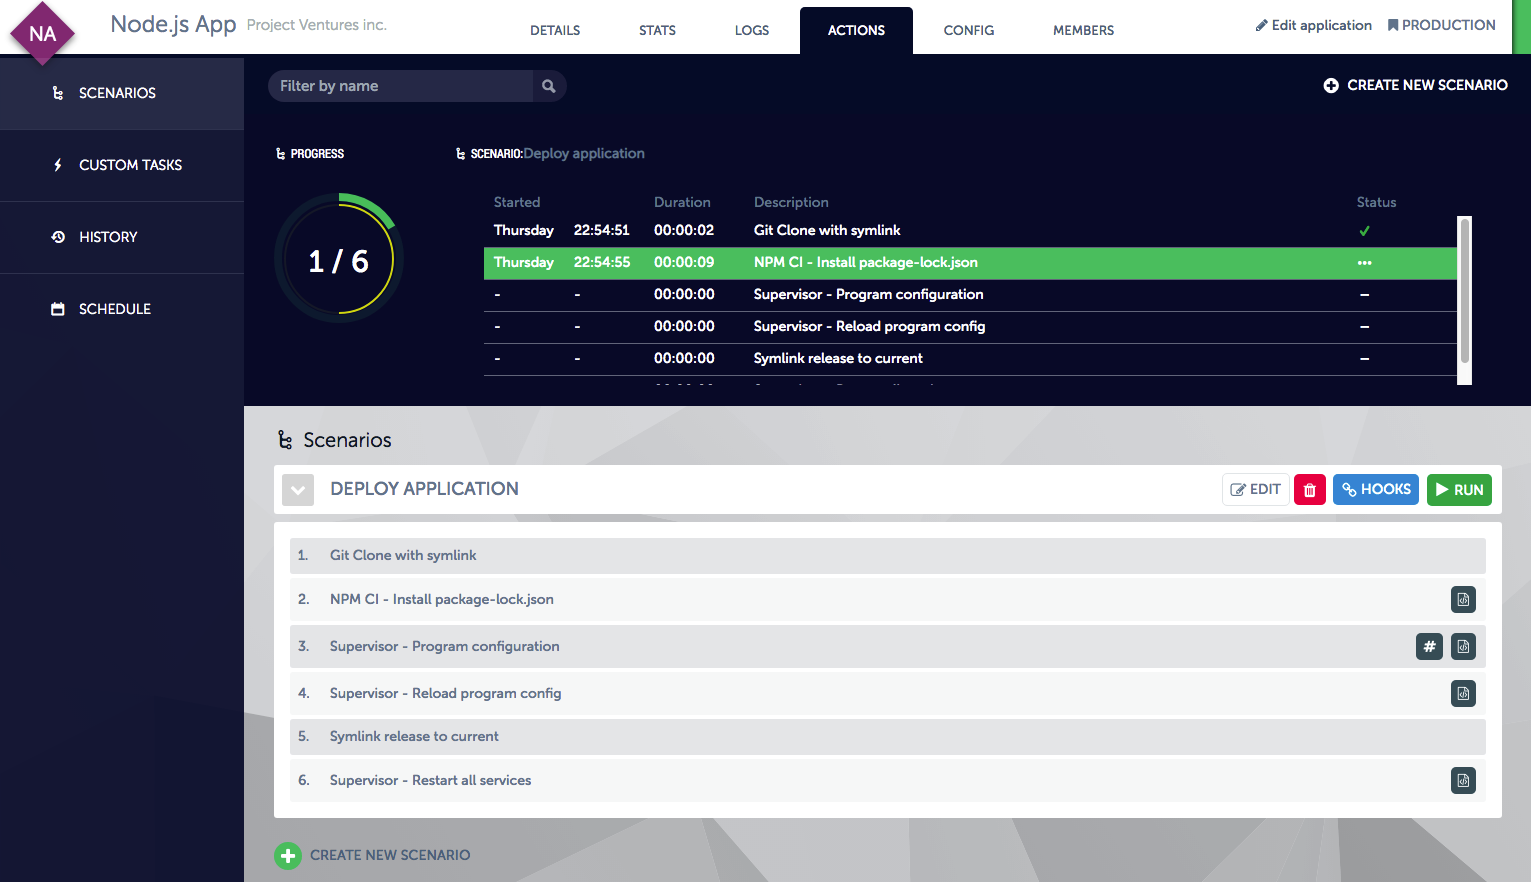
The "Deploy scenario" allows you to release any code changes in a safe and highly automated way, and keep the Node.js application running with no downtime. In case an error in actions 1,2 or 3 would occur, your running Node.js application is not impacted. You could run this scenario as much as needed.
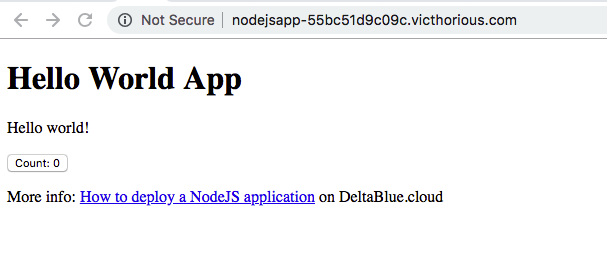
Step 5 - Test the Node.js application
By following the steps above, you have a Node.js application up-and-running
Open your browser and type: http://< deltablue-app-url >
Assuming the installation is successful, a screen similar to the following will appear:
Step 6 - Configure HTTPS
So we have got our Node.js application up-and-running, but it is serving our application over HTTP. To enable HTTPS, we could add a "proxy" like Nginx in-front and add some logic to pass requests to the Node.js and handle the installation of LetsEncrypt certificates. We prefer a easier approach by using the build-in HTTPS option of the cloud platform.
Just go to your application details >> click on the "Config" tab >> and then the "HTTPS & SSL" menu
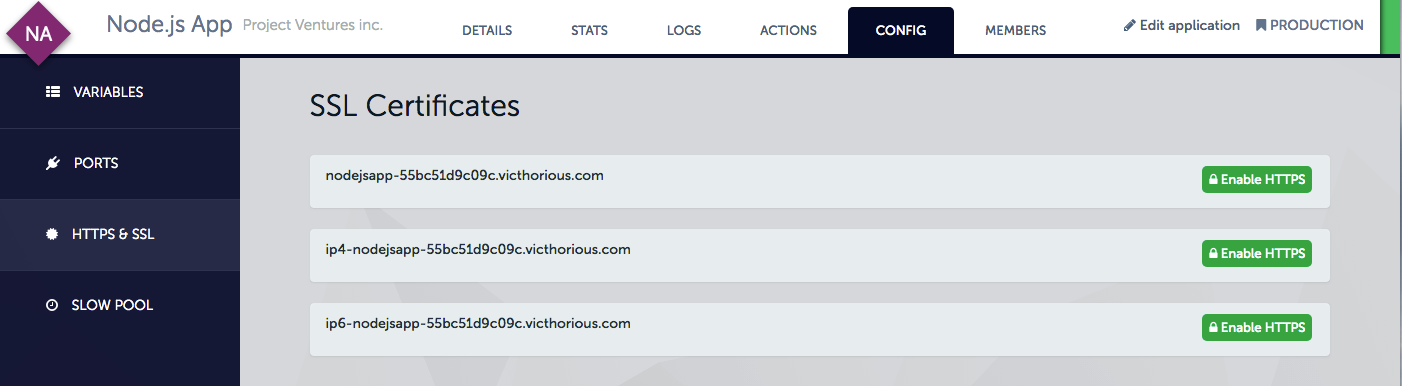
To activate an SSL certificate, you can use LetsEncrypt certificates or upload your own SSL certificate. The LetsEncrypt certificates will be renewed automatically.
Personal SSL certificates will be monitored for expiration, and you will receive a notification a couple of weeks before the SSL certificate expires.
You can enforce an automatic redirect by toggling "Enable HTTPS redirect"
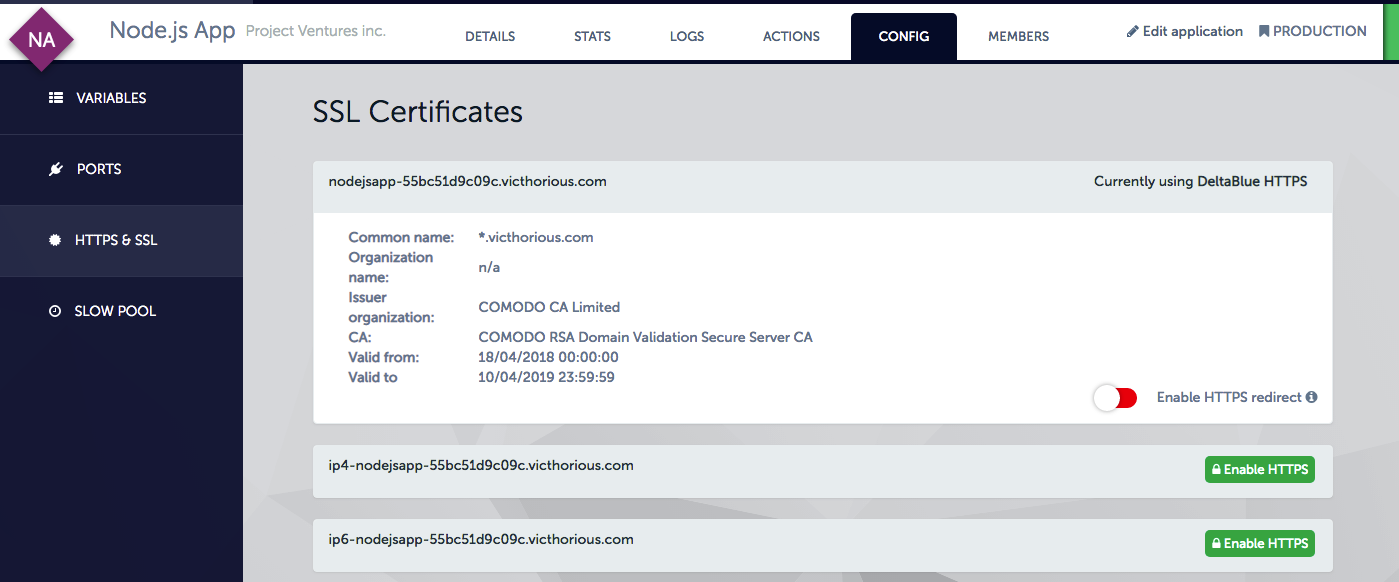
On the DeltaBlue platform, every environment in a project gets its own dedicated Edge Gateway. This Edge gateway takes care of handling SSL connections, load balancing and firewall security and much more.
Open your browser and type: https://< deltablue-app-url > to see if the Node.js application is being served over HTTPS.

Summary
To summarize, we have done the following steps to get our Node.js application up-and-running:
Provision a Node.js instance
- Create a project
- Create a application
- Link your GIT repository and desired branch or tag
- Launch application
Deploy & Run your Node.js application
- GIT clone the code in a build folder
- Install dependencies via
npm ci - Configure Supervisord to start and manage the Node.js process
- Reread and update the Supervisord program configuration
- Symlink the build for to the current release folder
- Restart the Node.js process via Supervisord
That’s it!
Conclusion
- We can build, deploy and run a Node.js-based application.
- We use Supervisord to restart the node app if it would crash.
- We have configured Supervisord to start the node app must after a reboot of the machine.
- We use secured HTTPS connection via the built-in feature to activate LetsEncrypt SSL certificates.
This is a very straightforward and easy workflow and by using a process manager to guard the Node.js process you can rest-assure that the application stays running, even when a occassional error would occur.
If you have questions feel free to contact us.
Let's talk!
Have a question, need advice, or just want to learn more about what we offer? Our team is here to help! Whether you're exploring solutions, planning your next move, or already deep into a project. We'll connect you with the right experts to give you practical, honest input tailored to your situation.
From technical questions to partnership opportunities, we're all ears. Drop us a line and let's see where we can make a difference.
Contact us